Reproduced with permission from terryb.
Written by terryb
A. Diodes
B. Transistors
C. Integrated Circuits
D. Test Equipment
E. Operators Manual
F. Reading Schematics
G. Electronics Troublshooting
This is part two of a seven part series intended to provide a basic knowledge of electronics, test equipment, service manuals and troubleshooting in order to allow the reader to effectively repair pinball games. With that goal in mind I have simplified the explanations and purposely glossed over some details that add no value, and can easily confuse beginners.
Important Note
Please read soldering tutorialbefore attempting any circuit board repairs. Replacing circuit board components requires advanced soldering skills.
Diodes
Diodes are the building blocks that transistors, bridge rectifiers and even integrated circuits are made of.
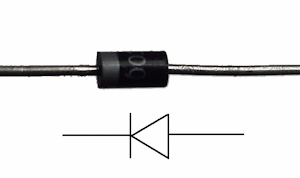
The most common function of a diode is to allow an electric current to pass in one direction while blocking current in the opposite direction. Current flows through a diode in the direction that the triangle is pointing (towards the banded end).
Diodes can be thought of as an electronic version of a check valve; water can flow in one direction but not the other. One exception is the Zener Diode which is specifically designed to begin conducting in the opposite direction when the reverse voltage reaches a specific threshold.
 In pinball machines diodes are most commonly used to protect circuits from voltage surges, but can also regulate voltage (Zener diodes) and produce light (LED’s).
Diodes are polarized and must be installed in the correct direction. The band around a diode marks the cathode terminal and points towards the negative side of a circuit. The opposite terminal is called the anode.
NOTE: Most, but not all, pinball LED’s obviate this polarity issue by adding additional circuitry to the LED. For polarized LED’s the negative lead should be shorter.
Diodes are used extensively in pinball games. In solid state models there is a diode (called a flyback diode) on every coil. Some pinballs, for example Williams WPC games, will have the solenoid diodes mounted on the driver board. Others may mount them on a set of lugs under the playfield.
The diode across the coil keeps high voltages, created when the coil is turned off, from traveling back to the driver or CPU board and damaging other components. If this diode fails. you will commonly find other component failures in the same circuit.
Diodes are also commonly used in lamp and switch matrix circuits (called blocking diodes). In this case their purpose is to prevent current from flowing backwards in a circuit and energizing other lines in the matrix.
Testing Diodes
A diode can be tested with a DMM set on the diode/continuity mode. Although this mode is typically part of the ohm range selection, it measures the drop in voltage across the diode rather than ohms. Put the positive (red) lead on the anode and the negative (black) lead on the cathode (the side with the band). You should get a reading in diode mode from .3 to .7 volts. Reverse the leads and you should get a null reading (depending on the meter this could be 1. or OL, check your manual if you’re not sure).
If either of these readings is out of range, or you read a dead short, the diode [maybe] bad. Note: This is not a definitive test, but more often than not will identify a bad diode.
Diodes cannot always be tested in circuit, if you get an out-of-range reading, remove one leg of the diode from the circuit and test again. [Editor’s note: An out of range value may occur when a diode is tested in circuit and may not indicate a bad diode.]
I see a lot of confusion about testing diodes in or out of circuit so I’ll cover a couple of examples. For the diodes on solenoids one leg must be lifted to test. Lamp and switch matrix diodes can be tested in-circuit.
Bottom line if there are other components in parallel with the diode, lift one leg of the diode to test. If the diode is in a serial circuit, you can test it in place.
Diode Replacements
Most diodes, other than Zener diodes, are rated at a peak voltage and peak wattage. You can typically substitute a higher amp or higher voltage diode. For example, a 1N4001 diode is rated at 1 amp and 100 volts while a 1N4004 diode is rated at 1 amp and 400 volts. The 1N4004, which is the most common diode in pinball, can be used in place of a 1N4001.
Zener diodes are a little more complicated to substitute since they’re rated for a specific voltage and wattage. While the voltage rating used in a circuit must be the same, you can go with a higher amp rating. In fact, you should always replace 1/2 watt zener diodes with their 1 watt replacement, see the example below.
A 1N5237 zener diode is rated at 8.2 volts and 1/2 watt while a 1N4738 is rated at 8.2 volts and 1 watt. Therefore you could, and should, replace the 1N5237 with the 1N4738.
Bridge Rectifiers
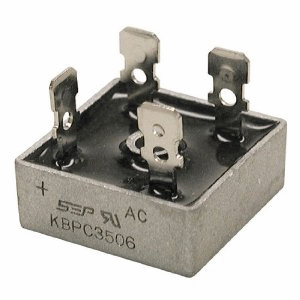 A bridge rectifier, which consists of four diodes, converts an alternating current input into a direct current output. They are the first stage in any power supply circuit and can be tested just like a diode. NOTE: testing a bridge rectifier with a DMM is not conclusive since it is not under load. If it tests bad though, it is bad.
A bridge has two AC terminals and two DC terminals (positive and negative). On the side of each bridge there are two labels: AC and a plus sign. The other AC lead is diagonal to the AC labeled lead and the DC negative lead is diagonal to the DC positive labeled lead.
Testing Bridge Rectifiers
You can test bridge rectifiers the same way you test diodes. The line the triangle is pointing at matches the line on the diode packaging (the cathode). You can test each leg individually as described below.
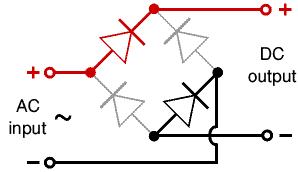
- Put the DMM in diode mode.
- Put your test leads on two adjacent legs.
- In one direction you should read .3 to .7 volts and null when you reverse the leads.
- Move clockwise and repeat this three more times for a total of four tests.
In the image above you would test from top to right, then right to bottom, then bottom to left and finally left to top.
Bridge Rectifier Replacements
Bridge rectifiers, like diodes, are rated at a peak voltage and peak wattage. You can typically substitute a higher amp or higher voltage rectifier. They also come in different packaging (not the box they come in, but the physical size of the rectifier) so take your old one with you when you go to the electronics store.
Transistors
 Transistors are used to amplify and switch electronic signals. A voltage applied to the base of the transistor changes the current flowing through the other pair of terminals (collector and emitter). Because the output power can be much more than the input power, a transistor can amplify a signal or switch a 12 volt circuit using 5 volt logic.
In switching (logic) applications the input is either high or low and the output the same, although it can have a higher voltage or current. In amplifier applications the input is varied and the output varies at a proportional rate.
Transistors are polarized and must be installed with the correct orientation. If you hold a tansistor with the flat side, or the side with the metal tab, facing away from you, pin 1 is on the left. On different transistor packages the emitter, base and collector are on different pins.
The three types of transistors you will be concerned with when working on pinballs are bipolar, Darlington (single package with two internal bipolar transistors) and FET (or MOSFET). Bipolar transistors are typically used in low current applications, while Darlington transistors are commonly used in high current applications. FET’s (Field Effect Transistors) where used by Stern in the White Star System games as power drivers (high current).
Bipolar and Darlington transistors are either NPN type or PNP type (see image to the right). Each has an emitter,collector and base (commonly abbreviated as E, C and B). The base is the leg that goes to the middle of the vertical line, the emitter is the leg with the arrow and the collector is the leg that is diagonal and attaches to the vertical line.
On a PNP transistor the arrow points inwards, indicating the current flow, and on an NPN transistor the arrow points outwards, indicating the current flow. The most important difference to understand between the two is that a NPN transistor is turned on by a high input and a PNP transistor is turned on by a low input.
- On a PNP transistor if the base is at a lower voltage than the emitter, current flows from emitter to collector.
- On a NPN transistor if the base is at a higher voltage than the emitter, current flows from collector to emitter.
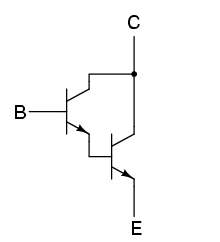 Many of the transistors you will come across in a pinball (TIP102, TIP122, SE9302, etc.) are Darlington transistors (also called Darlington pairs). Darlington transistors consist of two bipolar transistors connected in such a way that the current amplified by the first transistor is amplified further by the second (see image on right).
Darlington transistors often have internal diodes and resistors in addition to the two transistors. Because of this they are harder to test with a DMM in diode/continuity mode and will often give unexpected readings (compared to a standard bipolar transistor). See image below which shows the equivalent circuit for a TIP102. Note: The internal resistors and diode will not be shown on the schematic.
 Just to confuse us all, Darlington transistors are sometimes drawn on the schematic as two transistors and sometimes drawn as a single transistor.
The ECB physical configuration is not standard for all transistors since some use a different form factor (package). While normally the base is the middle lead, on some transistors like the TIP102 and TIP36C the left lead is the base (with the metal tab facing away from you and the leads pointing down).
To get a diagram showing the physical emitter, base and collector configuration for a specific transistor just Google the name of the transistor and the word datasheet (i.e. – “tip36c datasheet”). Note: Transistors with the left leg as base may be labeled as TO-220 or TO-218 package.
While there are many technical differences between bipolar transistors and FET’s or MOSFET’s, I will cover only those that relate to troubleshooting. For more info on FET’s see All About Circuits. The main difference in regards to troubleshooting is that a different technique is required when checking with a DMM.
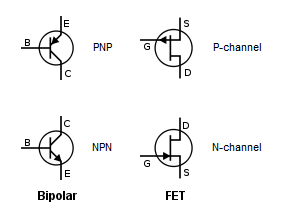
FET’s have three leads just like bipolar transistors, but they are called source, gate and drain (abbreviated S, G and D). These leads roughly correspond to the leads on a bipolar transistor: gate is like the base, source is like the emitter and drain is like the collector. Rather than PNP and NPN they are generally identified as N-Channel or P-Channel (see image to the right).
Making the gate (base) more positive on an N-Channel causes more current to flow from drain (collector) to source (emitter). Making the gate more negative on a P-Channel causes more current to flow from the drain to the source.
 Then there is the TRIAC, which are always on or off and switch AC rather than DC. They are commonly used in the general illumination circuit. Once triggered (the base goes high), Triacs stay on even when the trigger is removed and until the current through the main terminals goes to zero.
[Editors note: Triacs are used in Williams WPC Driver Boards to control the AC GI circuit. For more information on Triacs, see What is a Triac.]
Testing Transistors Under Power
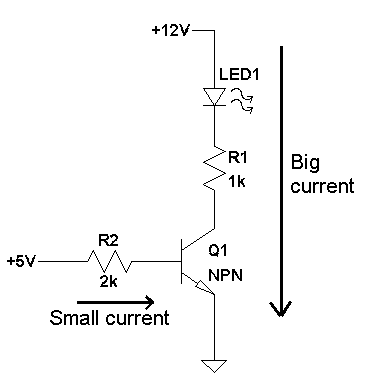 Transistors are one of the easiest components to test in-circuit with power. All you really have to check for is that the output changes when the input changes (not true for TRIAC’s as described earlier). The one issue that confuses a lot of people is caused by the fact transistors are often used to switch ground.
In the diagram to the right the LED will be on when the input voltage is high and off when the input is low.
But what voltage will we read at the collector (the lead that goes to R1) in each case? Remember our transistor is providing a ground path. So if the input is low we will read 12 volts at the collector since there is no path to ground. Without a path to ground the LED will not be lit. If the input is high we will read 0 volts (or a minimal voltage) at the collector. Now that there’s a ground path the LED will light.
This method applies to all transistors: bipolar, Darlington and FET or MOSFET.
Testing Transistors with a DMM
Note: You can do this test with the circuit board installed in the game, but the power must be off.
Transistors should really be tested out of circuit. Testing them in-circuit is not as simple as with a diode because the surrounding circuitry can affect the readings and give misleading results. Also note that Darlington Transistors often include internal components (resistors or diodes) that will result in bizarre readings, as compared to a bi-polar transistor.
The first thing you need to know is what type of transistor you are dealing with: bipolar, Darlington or FET/MOSFET. I will cover testing FET’s or MOSFET’s separately since they require a much different technique. The transistor’s datasheet will provide this info.
In the case of Darlington’s you also want to match the manufacturer of the component under test since some replacement transistors use different internal circuitry.
Next we need to know if the transistor is a NPN or PNP, which you can determine from the datasheet or the schematic as described previously. The middle letter (i.e. – the P in NPN) will tell you where to start with your probe leads.
For a bi-polar NPN put the positive, or red lead, on the middle leg (the base). For a standard PNP put the negative, or black lead, on the middle leg. As mentioned previously on some transistors, like the TIP102 and TIP36C, the base is on the left pin instead of the middle so the testing technique is slightly different.
Following are the test procedures for each type of transistor (readings are out of circuit). Note: Some DMM’s will read 3XX to 9XX instead of .3 to .9.
NPN Transistor, middle lead is base (i.e. – 2N4401)
- Put the DMM’s red lead on the center leg (the base) of the transistor.
- Test to each outside leg with the black lead.
- You should get a reading between .3 – .9 volts on each (the two reading should be about the same).
- Put the black lead on the center leg of the transistor.
- Test to each outside leg with the red lead.
- Your DMM should read open on each.
- Test across the outside legs, you should get an open reading.
- Reverse leads on the outside legs, you should get an open reading.
PNP Transistor, middle lead is base (i.e. – 2N5401)
- Put the DMM’s black lead on the center leg (the base) of the transistor.
- Test to each outside leg with the red lead.
- You should get a reading between .3 – .9 volts on each (the two reading should be about the same).
- Put the red lead on the center leg of the transistor.
- Test to each outside leg with the black lead.
- Your DMM should read open on each.
- Test across the outside legs, you should get an open reading.
- Reverse leads on the outside legs, you should get an open reading.
PNP transistors, left lead is base (i.e. – TIP36C and TIP42)*
- Put the DMM’s black lead on the left leg of the transistor.
- Test to the middle leg and the right leg with the red lead.
- You should get a reading between .3 – .9 volts on each (the two reading should be about the same).
- Put the red lead on the left leg of the transistor.
- Test to the middle leg and the right leg with the black lead.
- Your DMM should read open on each.
- Test across the middle and right legs, you should get an open reading.
- Reverse leads on the middle and right legs, you should get an open reading.
NPN transistors, left lead is base (i.e. – TIP102, TIP120, TIP121, TIP122, 2N6045 and SE9302 )*
- Put the DMM’s red lead on the left leg of the transistor*.
- Test to the middle leg and the right leg with the black lead.
- You should get a reading between .3 – .9 volts on each (the two reading should be about the same).
- Put the black lead on the left leg of the transistor.
- Test to the middle leg and the right leg with the red lead.
- Your DMM should read open on each.
- Test across the middle and right legs, you should get an open reading.
- Reverse leads on the middle and right legs, you should get an open reading.
* Orient the transistor with the metal tab facing away from you and the leads pointing down.
Remember that Darlington transistors can sometimes give odd readings, generally from the base to the emitter. The datasheet will show the internal circuitry and provide an indication that you should expect “abnormal” readings. On a TIP102, for example, when testing with the black lead on the left leg and the red lead on the right leg, you will get a reading of about 1.9 volts instead of open (this is because of the internal resistors).
When in doubt compare your readings to a known good transistor of the same value and the same manufacturer.
Darlington transistors: TIP102, TIP120, TIP121, TIP122, 2N6045 and SE9302.
Testing FET/MOSFET
While it takes specific equipment to accurately test a FET out of circuit, if you have a suitable DMM you can do a fairly accurate test. Most, but not all DMM’s will put 3-4 volts across the device under test (in diode mode) and will work fine. On the other hand some DMM’s use a lower voltage (as low as 1.5 volts) and will not work for this test.
Note: Do not touch any part of the transistor except the case or tab with your hand or you may turn it on
- Black on source, red on gate: turns on the transistor.
- Black on source, red on drain: low reading (.00X).
- Red on source, black on gate: turns off transistor.
- Black on source, red on drain: read open.
You can also create your own, more accurate, test fixture as described in this article.
FET/MOSFET: 22NE10L and IRL540N.
Transistor and MOSFET Replacements
In most cases you will be able to find an exact replacement for any transistors. Following are some suggested replacements you should use instead of the original product for improved reliability.
- TIP120, TIP121, TIP122, 2N6045 and SE9302 — replace with TIP102
[Editor: TIP102 also replaces TIP110. That worked for us.] - TIP42 — replace with TIP42C
- 13N10L– replace with IRL530N (Editor: or IRL540N)
- 22NE10L — replace with IRL540N
References
- The following is a great site that provides more in-depth electronic tutorials: All About Circuits.
- Randy Fromm’s YouTube Channel also has some great videos on basic electronics theory.
- Transistors as a switch – Additional information on how transistors are used in digital circuits.