This article was originally posted on PinballRehab.com.
Reproduced with permission from terryb.
Written by terryb
This article covers using vinyl decals to repair cabinet graphics that are so severely mangled there is no choice but to cut away the damaged area. The same technique is appropriate when a portion of decal has been peeled off during moving, or some other such misadventure.
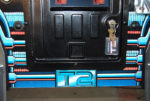
Since the graphics in this case are dithered (small colored dots used to create the illusion of more colors used in the printing process) it’s impossible to recreate the look with paint (see Image 2). When replacing graphics that have to be cut-out it’s best to use a vinyl decal paper in order to best match the thickness of the original decal.
 The game in question is a Terminator 2 and you can see the damage caused by a ravenous dog (that’s what I was told) in Image 2 (bottom right-hand corner of the cabinet).
See this article on Creating and Applying Water Slide Decals for situations where the underlying graphics are in good condition and you want as thin a decal as possible.
For more info, see Restoring Cabinet Graphics – Overview, which covers the different types of pinball cabinet graphics and provides an overview of the restoration process. Links are then provided to individual articles (like this one) that cover each step of the process. All of the detailed articles are also included in the Related Articles at the bottom of this page.


Be aware that inkjet decals will fade more quickly than laserjet decals. If you have an HP printer use their Vivera ink, which will have much better resistance to fading and perform more like a laserjet decal. Other brands of printers may have similar ink products.
Some types of clear will lift the ink on either type of decal (especially auto clear for inkjet and lacquer for laserjet). If you are going to be applying a clear coat (other than acrylic), test it first on a sample decal.
Supplies
While you can get most of what you need at a hobby shop or crafts store, I strongly recommend using professional grade products.
If you’re using an inkjet printer get the Inkjet Waterproof Vinyl. If you’re using a laser printer get laser printable waterproof glossy (white or clear) adhesive film. Both decal papers are designed to absorb ink and result in a waterproof decal. The inkjet paper is matte and the laser paper is gloss and should be purchased with the permanent adhesive rather than the reusable adhesive.
In my case I used Waterproof Over Laminate Semi-Gloss Clear Sheets to match the gloss of the original decal and provide additional protection from water and cleaning supplies. The combination of the two perfectly matched the thickness of the cabinet decal. If you need a thinner finished decal you can use UV Laminate Spray or Krylon PreserveIt! instead of the laminate.
Surface Preparation
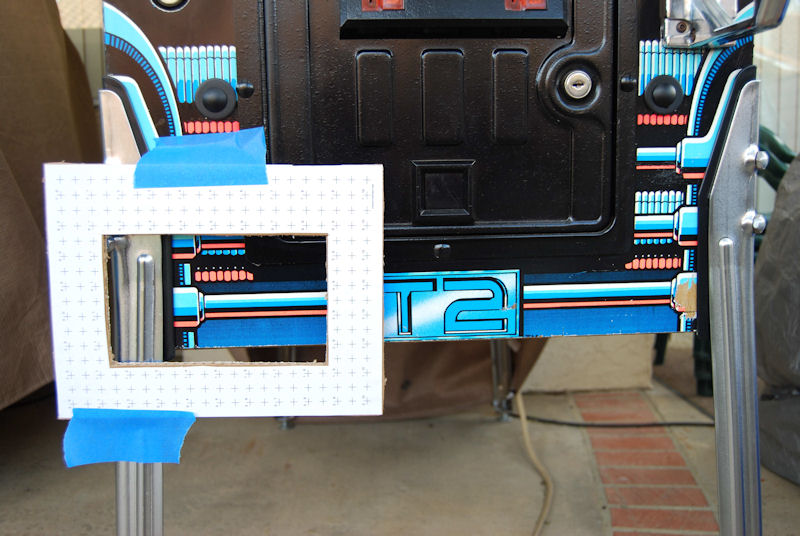
 First trim away any damaged decal and use a straight-edge to trim along the edges where you will be installing the new decal. The border of your new decal should be along a black area or where there is a color change so the decal blends in better without having to exactly match colors. If possible splitting along a black area is the easiest way to go.
 In this case I was able to trim so there would be a small black border around the vinyl decal and I left part of the black on the cabinet decal (see Images 3 and 4). Since black is black you can use this technique rather than splitting two colors.
I then used a camera and photo grid to recreate the graphics (see this article) and edited them with Corel Photo-Paint (see this article).
Finally you will need to sand the bare wood and apply a wood sealer so that you get good adhesion with the decal. I used 400 grit sandpaper and a wood sealant from Home Depot.
Printing and Prepping Decals
When printing decals always use your printer’s photo quality setting. This will provide a denser pigmentation application. When printing samples for color matching apply either the laminate or clear spray, whichever you plan on using. If you don’t your color match will be quite a bit off.
Graphics should always be printed at twice the resolution that was used when editing (300 DPI).
In Image 4 you can see the decal I’ve created for the Dracula pinball using a DSLR camera (see this article for more info) and edited with Corel Photo-Paint (see this article for more info). I printed a slightly larger black border than needed so I could trim the decal down to exactly fit the damaged area. Use the same approach if you’re splitting colors.
Because it was impossible to get a bright enough orange from my printer I used a fluorescent orange paint on the orange part of the decal.
Let the decal dry for 24 hours and then apply the laminate with a bray (used for rolling ink and available at most craft stores) or wallpaper seam roller (available at most hardware stores), or apply a couple of coats of clear. If you used spray clear let the decal dry for 24 hours before installing.
Applying Vinyl Decals
Do the final trimming of the decal till you’ve got a perfect fit. Remove the backing from the decal and press in place. Then use a bray or seam roller to get out any air bubbles and ensure good adhesion.
Finishing Touches
 If you were lucky enough to have a black border you can fill and cleanup any gaps with black paint.
You can see the finished product in Image 5. Note: The orange on the vinyl decal is actually the original color whereas the cabinet decal is faded. I later painted the rest of the cabinet orange to match.
Comments
Comments, including suggestions, improvements, errors, etc. are welcome (see below).
If you have a specific question about your game that does not directly apply to this topic, please see our FAQ section.