This article was originally posted on PinballRehab.com.
Reproduced with permission from terryb.
Written by terryb
A. Basic Soldering Tutorial
B. Basic Desoldering Tutorial
– Supplies Needed
C. Tools for Advanced Soldering
D. Advanced Soldering Tutorial
E. Advanced Desoldering Tutorial
This is part one of a five part series on soldering. This article is specifically oriented towards beginners and playfield soldering. It covers tools and supplies and the soldering skills needed to replace a diode, switch, solenoid or broken wire.
Advanced skills, better equipment and experience are needed before soldering pinball circuit boards.
This tutorial is oriented towards getting you soldering quickly and properly. If you’re interested in more advanced topics see Advanced Soldering – Tools and Supplies, which is part one in our three part advanced series. Part two of the advanced series covers soldering techniques and part three covers desoldering techniques.
Note: To understand exacting standards check out this WWII era US Navy Soldering Course.
Soldering Tools and Supplies
I will spend some time on this topic because a lot of the frustration felt by those new to soldering (or taught by Dad–sorry Dad’s) is the result of cheap tools and/or supplies. Avoid Walmart, Home Depot and Lowe’s. Find a good local electronics store like Fry’s or buy online at Fry’s or MCM Electronics.


The first thing you need is a quality soldering iron. Although temperature controlled irons are a better long-term investment (you can also use them for board work) a good 25 Watt soldering iron will do the job for basic pinball soldering tasks and is easier to use when working under a playfield. You can get either a Hakko N454JN-V12 (replaced by the 15 watt Hakko FX650-02 or Hakko Dash) or a Weller 30 Watt for $20 to $43 dollars.
The difference between a $20 soldering iron and a good soldering iron is not just the fact the latter is better made and will be more reliable and last longer. There is a vast performance difference between the two. In addition, you never want to use a soldering iron with a 2-prong AC plug on circuit boards. On a 3-prong ESD iron, the soldering tip is connected to ground to in order to prevent ESD (electro-static discharge).
So spend the extra $15 and get a good iron.
Note: You can pick up the Hakko FX-888DX Soldering Station at Amazon for about $120. This model is temperature controlled and if you plan on moving on to circuit boards I would recommend you make the investment.
[Editors note: We have had great luck with a Tenma Temperature Controlled Soldering Station, although the current model does not have a digital display. It is about $105. We prefer the temperature adjustable soldering station for circuit board work.]
The tip is as important as the iron, and this is where those $20 soldering irons cut corners. The Hakko product comes with a conical tip, which is worthless, so you’ll have to pick up a chisel tip (see image 1) for about $5 (they only offer a .118″ chisel). Conical tips do not offer enough surface contact area.
The Weller Professional comes with a an ST3 tip (.125 screwdriver). The ST4 tip (.187 screwdriver) provides a larger surface area for under playfield work, but the ST3 will work fine. The ST tips are solid copper with a double-coat of iron to extend their life.
You will also need a brass tip cleaner (looks like a Brillo pad) and a soldering iron stand. The type of tip cleaner will not reduce the iron’s temperature while working or shock the tip [like a wet pad does] ( thereby shortening its life). Hakko makes a nice stand that includes the tip cleaner.
Next you’ll need some good quality solder, solder flux, flux remover and a fiberglass pen (see Image 2 and Image 3).

For the solder get 60/40 (60% tin and 40% lead) rosin core in either a .031 or .040 – .060 diameter. The smaller diameter is for circuit board work and the larger diameters are for solenoids, wiring, etc. Although the smaller diameter will work fine in both applications and gives you greater control.
I use Henkel’s Multicore solder, but a single core solder like the one from MG Chemicals or Kester is fine for playfield work. The multicore solder has 5 strands of flux instead of one and flows better than single core.
Contact Cleaning Supplies
 Other than quality (I recommend Kester, DeoxIT or MG Chemicals) the main difference in solder flux is the packaging. I use a paste that comes in a syringe, but other choices include a rub-on applicator and a paste or liquid that you apply with a brush. Whatever style that floats your boat is fine, although the brush is kind of old-school and people may make fun of you.
Actually, the brush type is fine, but I don’t think the liquid flux works as well.
In regards to the fiberglass pen, there’s not a lot of difference so just pick it up wherever you get the rest of your products. I use the MG Chemicals PC Board flux remover.
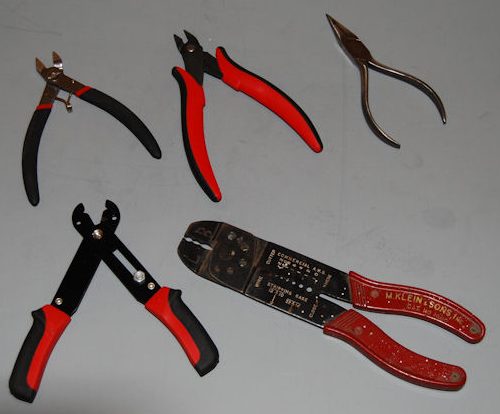
At this point you could start soldering, but there are a couple of other items that will make your life easier (see Image 4). The first is a good pair of side-cutters that are made specifically for working on circuit boards. One side is flat, which works well for clipping leads when you progress to circuit boards. You will also need some wire strippers.
There are two types (see Image 4) and beginners will usually have more luck with the one on the [bottom] right in the photo. It has several notches for cutting different gauge wires so you are less likely to nick, or cut, some of the wire strands. The one on the left takes a little more technique.
Since most of us don’t have three hands, spring tweezers will come in handy (see Image 3). I don’t like alligator clips since they will tear up the insulation on wires. The same goes for hemostats unless you’re very careful.
While they sell a variety of soldering picks, which look like variants on a dental pick, the only one you really need has a slot for grabbing and twisting small wires like on diodes (see Image 5, the bottom pick). A small pair of needle-nose pliers will also come in handy when working with small wires.
Of course, if you’re going to be soldering you’ll probably have to desolder, so you’ll need some additional tools and supplies, but I’ll cover that in the desoldering tutorial.
Safety
As with most safety issues the government gets involved in, the risks from lead solder have been blown out of proportion. Lead is not absorbed directly though the skin, but it can enter through cuts, tear ducts, nostrils or sucking your thumb. To avoid exposure you can either wear some thin surgical gloves or wash your hands when you’re done soldering.
The bigger health concern when soldering is vapor from the flux. You can use an air scrubber, although the small one’s don’t work very well, so I just use a small fan to blow the vapor away from me towards my neighbor’s house.
Note: This advice is for healthy hobbyists with limited exposure to lead solder and flux vapor, not people who solder eight hours a day for a living or have other illnesses.
It’s also a good idea to wear protective eye wear while soldering.
[Editors note: Most of the information available says there there is almost zero lead in the vapor at typical soldering temperatures.]
Preparation
Enemy Number 1 of a good solder joint is oxidation. It occurs when oxygen comes in contact with metal, and the process is amplified by heat. The more oxidation present–and it will be in a twenty some year-old game–the harder it will be to solder and the more likely you will get a cold solder joint.
Removing oxidation is a two step process: mechanical and chemical. First use a fiberglass pen to brush leads on components, solenoid or switch lugs, etc. Anything you want solder to adhere to. See Image 6 prior to mechanically cleaning a solder joint and Image 7 for after cleaning (note: this is just an example, since you would obviously unsolder everything before cleaning).
The metal should be nice and shiny after cleaning.
In the case of wire just cut off all exposed wire and strip a new section. Make sure you have enough length before doing this, and if not, clean the wire with the fiberglass pen and definitely use flux to get between all of the strands.
The second step, which is not always necessary but is a good habit when learning to solder, is to apply some flux to the joint. Make sure it is applied to all sides of any metal you want the solder to adhere to.
Let’s Get Physical

The first part of any solder joint is a good physical connection. A good physical connection extends the life of a joint and prevents it from moving while cooling, which can cause a cold joint.
In Image 8 I’ve bent the end of a diode into a J-shape and installed it on a switch (it still needs to be crimped down). In Image 9 I’ve done the same with a stranded wire (always twist the wire before working with it to prevent stray strands).

Some lugs will not have a hole large enough for both the diode and wire, so wrap the diode all the way around the lug (see Image 10 and Image 11, it’s a little hard to see).
Tinned wires will stress or crack easily when bent so I prefer to work with non-tinned wires. Always twist stranded wires before and after installing in a lug to make sure there are not any loose strands. See the image to the right where a poor soldering job resulted in loose strands of wire causing a short across the switch and to ground.
Soldering
Finally, we’re ready to do some soldering. If you’re using a standard iron, plug it in and let it preheat for at least 10 minutes. If using a temperature controlled iron set it around 700 degrees and let it come up to temperature.
Solder melts at a lower temperature than is required for it to flow and achieve a proper wetting action, so give the iron plenty of time to heat up.
While you’re waiting, arrange the part you’re working on (solenoid, switch, etc.) and the wire/diode so they do not move or wiggle as you are applying the soldering iron tip and solder. When working under the playfield you sometimes have to get creative. Use a clamp or vise grips to hold the part if it’s been partially removed and is dangling from the playfield.
Use spring tweezers to hold the wire if necessary, which shouldn’t be if you have a good physical connection as described above. You could also use a heat sink but it will make soldering more difficult as it draws heat away from the joint.
Before soldering always clean and tin the soldering tip by applying some solder to both sides and then wiping the tip on a brass tip cleaner (looks like a Brillo pad). Use the tip cleaner anytime you get excess solder on the tip while soldering.
Add a little flux to all sides of the joint, this will remove any remaining oxidation and help the solder flow (this step is optional, but a good idea when you’re learning). It doesn’t take a lot.
The key to soldering is placing the iron tip in the right location and getting maximum surface contact between the iron and two parts to be joined. This is why conical tips suck, you can’t get enough contact area between the tip and the joint. In Image 12 I’ve placed the soldering tip so it has maximum contact with both the wire and the solenoid lug.
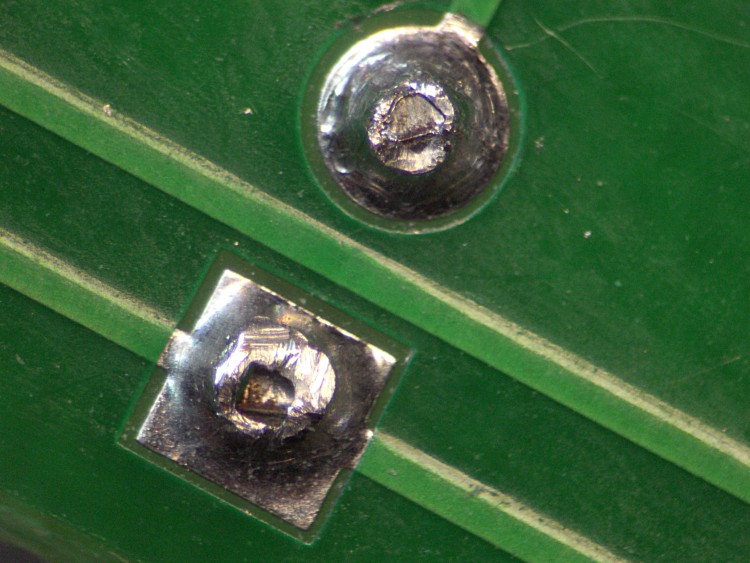
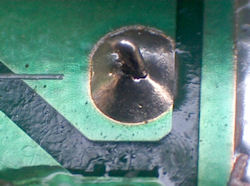
In the image to the left (cold solder joint) you can see a crack around the lead where solder has not adhered. This is caused by either not having the iron’s tip in contact with both the trace and the lead while soldering or the lead was oxidized.
Wait 1 – 3 seconds after applying the tip to the joint (the length of time depends on the size of the joint and surrounding conductive material that will draw heat away). Briefly place the solder at the point where the tip is touching the wire and lug (as it melts a solder bridge will form which helps conduct heat to the joint). As soon as the solder begins to melt (which should happen almost immediately) move the solder to the opposite side of where the soldering iron is placed (see Image 13).
Note: Do not use the soldering iron tip to melt the solder, you will get a cold joint.
As you add solder it will form a convex ball and then when the solder begins to flow the surface of the ball will briefly, and quickly, shrink (as the solder flows through the lug’s hole to the other side) and become slightly concave. Once the solder is flowing, add a little more solder until you have good coverage and you’re done.
Turn the part over and make sure the back side has flowed properly and the wire/diode is soldered completely to the lug. If not, put the soldering iron back on for 2 – 3 seconds and add a little solder, following all of the steps as described above.
If the joint is moved while cooling you risk a cold solder joint. Also do not use compressed air, flux or anything else to cool the joint down faster. Once the joint is cool clean the area with flux remover (flux turns acidic after heating and must be removed).
When you’re done, clean the tip, flood it with solder, wipe it again and turn off the soldering iron. This will help protect and prolong the life of the tip. Do not clean the tip by dipping it into flux.
Special Situations
When splicing two wires use the following technique. Slip a length of heat shrink tubing over one of the wires before starting. Twist the strands of each wire and then form them into a J-shape (see Image 16). Crimp the wires together, making sure there are no stray stands and then solder. After the joint cools, slide the tubing into position and shrink with a heat gun.
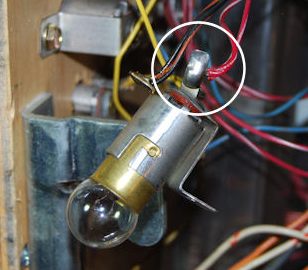
When soldering the wire back onto the lead of a pop bumper lamp holder, use some painters tape to hold the wire against the playfield. You may have to bend the wire around a little to get it to lay flat against the lamp lead before soldering.
External Links
Basic Soldering Lessons – Not specifically pinball, but a nice video series.
Comments
Comments, including suggestions, improvements, errors, etc. are welcome (see below).
If you have a specific question about your game, please see our FAQ section.
Hi,
I’m trying to solder braided wire to the wiper finger that I replaced. Do you have any suggestions or tips on how to solder in this situation?
Thank you.
We usually add solder directly to the braided wire prior to soldering it to the part. Sometimes that is referred to ‘tinning’ of the wire.
After you get a fair amount of solder on the braid as well as the part to be soldered, it is generally pretty easy to hold them together, heat and solder.
You may need a fairly powerful soldering iron for this. A lower wattage iron used for circuit board work may not generate enough heat to make this connection.