A. Clearing the Playfield
1. Supplies Needed
2. Preparation
3. Clearing the Playfield
4. Removing the Ramps
5. Removing the Pop Bumpers
– Removing the Sling Shots
B. Cleaning the Playfield
6. Cleaning the Playfield
C. Repairing the Playfield (optional)
7. Playfield Repair
8. Fixing Inserts
9. Sealing Your Work
C. Rebuilding and Adjusting
10. Rebuilding the Mechanicals
11. Switches and Reassembly
12. Final Testing
This is a multipart series on how anyone can do a complete overhaul of your pinball machine and make it work like new.
Carefully inspect the inserts on your playfield. If they are all flat, then proceed to Part 9. If unsure, try rolling a pinball slowly over the surface. If the pinball deviates while crossing an insert, then proceed below.
Prior to starting on this page, be sure to read the Supplies Needed section. There are supplies listed specifically for inserts. Also complete Part 7 – playfield repair – to repair any paint damage around the inserts.
If planning on filling inserts, you will also need to obtain a small container (pint) of water modified polyurethane – clear gloss. Others have used cyanoacrylate (Super Glue) which has to be the thin liquid variety – not the ‘gel’ type.
Problems With Inserts
 Inserts on a playfield can ‘cup’, where the insert sinks in the center, or they can lift. Each has different solutions.
Cupped inserts occurs mostly with round inserts. Years of heat from incandescent bulbs causes the plastic to sink. The deformed insert affects play and the pinball’s direction is changed as the ball rolls over the damaged insert. There are three ways to fix this:
1) Fill the center with a clear liquid that will harden (polyurethane or cyanoacrylate).
2) Remove the insert and sand it flat.
3) Replace the insert.
Filling Cupped Inserts
Fix 1) is by far the easiest. This is especially true if the insert has any artwork on it that would have to be replaced. We have filled many inserts and they come out looking great. The only caveat is white inserts can yellow slightly, especially if using water modified polyurethane.
Prior to attempting to fill a cupped insert, be certain to complete Part 7 – Playfield restoration around the cupped inserts. It is far easier to touch up around the inserts prior to filling.
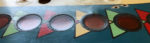
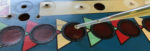
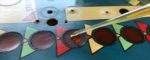
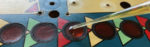
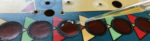
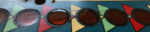

Image 1 shows the cupped round inserts. Images 2 – 6 show the sequence of filling the insert. We use the disposable dropper’s tip as a sort of paint brush. Because of the surface tension of the liquid, there tends to form a ‘drop’ shape. It is important to spread the liquid around the insert.
Don’t try to fill the entire depression in one try. Several thinner layers are always better. And be certain to not overfill the insert. After the fill dries, check to see if it is level by placing a ruler or other flat edge over it. If not flat, try another fill.
Inserts that are not round can be very difficult to fill properly. For those, it maybe better to replace them or sand them flat.
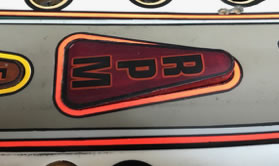
Triangular Inserts

It is possible to also fill cupped triangular or irregularly shaped inserts. But these inserts are more likely to suffer from lifting and that cannot be corrected without removing the inserts. These inserts are then sanded flat or replaced with new ones.
Most pinball supply places stock a huge variety of inserts for almost every pinball machine. But they use the original molds and these inserts were glued in the factory, then the entire table was sanded flat. That means new inserts will stick above the playfield significantly unless they are sanded prior to installation.
Removing Inserts
Removing an insert is not difficult. With practice, it can be done pretty quickly by following the following steps:


Note: If there is printing on the insert, be sure to scan it prior to removing. It maybe necessary to replace this printing with a new decal.
1) Carefully cut around the edge of the insert with an X-Acto knife (or similar). The goal here is to break the playfield clear coat along the lines of the insert (image 10).
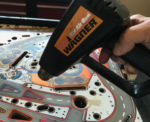
2) Heat the surface of the playfield with a heat gun. Be careful to not overheat or damage the surface (Image 11).
3) Sharply tap the bottom of the insert using a shape approximately the same size as the insert (image 12).
It should pop right up (image 13). The insert has been tapped and has broken free, but not completely removed. A couple more light taps will allow it to be removed.
The key to making this happen easily is trimming around the insert. Otherwise, removing the insert is liable to damage the area around the insert.
In the image, we have cut out of spare wood a piece nearly the same size as the insert. This is used to spread out the force of tapping on the insert evenly across it. If tapped using a smaller object, the insert will likely break.
We put a piece of paper over the back of the insert area and traced the opening. We then used this to mark the wood and cut it out on a table jigsaw (image 14).
For round inserts, a socket of the correct size will usually suffice.
Cleaning Up
 Prior to reinserting or replacing the insert, it is crucial to cleanup the area around the insert. Use a sharp X-Acto or similar knife to dig out any remaining glue, dirt or damaged wood.
Check to see if the removed insert is flat. Many times an insert that was lifting is not warped and can be reused. If reusing the same insert, the edges will have to be sanded in order to remove any remaining glue. This step is skipped if the insert will be replaced.

If replacing with a new insert, you will find that they are too tall. That is by design as when playfields are manufactured, the inserts are installed, and then the playfields is sanded flat. Because of this, you will have to sand the insert down. Plus, most inserts are not flat either, because they don’t have to be.
 Most people use sandpaper, typically starting with 60 or 100 grit, then when the insert is shined enough, it must be sanded with 150, 220 and perhaps finer sandpaper.
If unsure that the sanded insert is clear enough, it can help to wet it with isopropyl alcohol or Naphtha and see if the light shines through.
 Also, be certain to rough up the edges with coarse sandpaper, so that the adhesive sticks better.
If the insert hole in the playfield is cleaned well, you can try a fit test. That is the only way to insure that the new insert is the right height. The last thing you want to do is glue it all up and find that it is too tall.
Glueing the Inserts
Prior to gluing the inserts into place, insure that they fit. You must have sanded them down to the proper height, then sanded them to be clear. If the hole is not cleaned out, doing a fit test maybe difficult. We don’t want the hole to be too loose either.
 Also be sure to lightly sand the edges so that the glue sticks.
Prior to gluing, pre-treat the edges with 3M Scotch-Weld Instant Adhesive Primer AC77. This is supposed to make the epoxy stick more reliably to the plastic insert.
For gluing, we use a clear, fast setting epoxy. Epoxies come in two tubes. These are to be mixed just prior to gluing the insert in place. We snip off the tip of a Q-tip to use to mix the two and apply to the wood of the insert. We mix the glue on a small piece of paper or the back of a business card.
 Apply a light amount of the epoxy around the wood of the insert. We don’t want so much that it squeezes out and onto the playfield or the insert.
Since this is fast setting Epoxy, we need to work fairly quickly. Place a piece of waxed paper over the insert, a block of wood, and clamp the insert into place. If you have sanded the insert properly and prepared the hole, the insert should set down and be flush with the board.
We usually loosen and then inspect the insert to insure that it is sitting flat and not tilted. We don’t want a surprise after it is set.
Repairing the Insert Decals
Many of the inserts have printing on them. Sometimes, the insert is in great shape, but the printing is bad. Other times, you have had to replace the insert. In either of these cases, you will need to replace the printing on insert.
Some inserts have ‘decals’ on them. If the decal is in great shape, and the insert does not have to be replaced – but it has just lifted, then it maybe possible to remove and then re-glue the insert without replacing the decal.
On a recent Getaway we worked on, many of the decals on the inserts were damaged. For popular games like this, it maybe possible to purchase a set of decals and replace the existing ones. But more often than not, it will be necessary to make your own.
We have instructions on making decals for cabinet repair. and water slide decals. We will also be creating a page on making decals for playfield repair.
Here, you will need clear (not white) water slide decals and follow the procedures above.
After applying the decals, it will be necessary to seal the deal. If you are planning on sealing the entire playfield, the decal will be sealed at the same time. If the playfield will not be re-sealed, then use an eyedropper to place a thin layer of water-based polyurethane on top of the decal as outlined above, in Filling in Cupped Inserts.