A. Clearing the Playfield
1. Supplies Needed
2. Preparation
3. Clearing the Playfield
4. Removing the Ramps
5. Removing the Pop Bumpers
– Removing the Sling Shots
B. Cleaning the Playfield
6. Cleaning the Playfield
C. Repairing the Playfield (optional)
7. Playfield Repair
8. Fixing Inserts
9. Sealing Your Work
C. Rebuilding and Adjusting
10. Rebuilding the Mechanicals
11. Switches and Reassembly
12. Final Testing
This is a multipart series on how anyone can do a complete overhaul of your pinball machine and make it work like new.
A completely shopped pinball playfield is one that is completely overhauled. It will play like it is new – if done properly. Here are step-by-step procedures to make sure your’s comes out perfectly.
Note that not all sections may be necessary with all playfields. For example, if there are not any problems with the inserts, you can skip that section. If not repairing the playfield, the touchup and sealing sections (7, 8, & 9) can be skipped.
Preparation
Your Work Area

You want a work area where the parts can be spread all over the place for weeks. You cannot allow the kids or your cat to come in and toss your carefully organized box of parts all over the place.
You could leave the playfield in your pinball machine and shop it. But you should not. The best idea is to build yourself a cheap rotisserie. If you don’t want to do this, then set aside a workbench area with end supports to lift the playfield up off the table.
If you decide to work on the playfield while it is installed in the pinball cabinet, it can be done. The best ones to work on are those older lighter playfields that pull up and lean against the backbox. You will end up raising and lowering it a hundred times. We use spring loaded plastic clamps to the cabinet, to keep the bottom from sliding out. If you are rebuilding an EM or an early SS without ramps, it is possible to do your work while the playfield is in the cabinet.
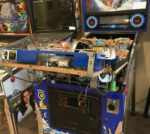
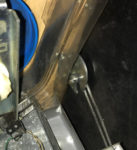
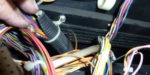
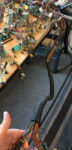
Many newer playfields slide out on ‘skids’ and lift up (see photos 1 and 2 above). It is possible to work on those too. You will get a workout.
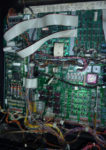
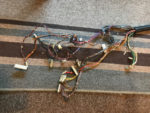
There is one style that is nearly impossible to work on in the cabinet: those playfields that rotate on two pins, like Funhouse and The Addams Family. It is nearly impossible to access the back of the playfield (see last photo above).
Organization
Organization and documentation is the key to taking everything off the playfield, then successfully getting it back together. Pictures! The digital camera is your best friend. Take photos before, after each step. You cannot take too many.
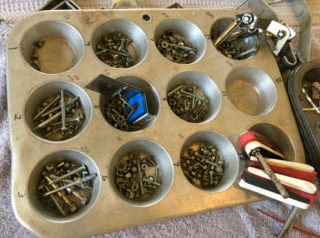
Storage of the parts is the key to success. We use old muffin tins. They are numbered 1 – ? and we fill them in order, then return the parts to the playfield in reverse order.
Replacement parts will be needed. Be sure to order everything you might need well in advance. It is annoying to have to wait a week or more in order to continue.
Removing the Playfield from the Cabinet

If you decide to remove the playfield from the cabinet, here are the steps:

1) Remove the pinballs. For most games, lifting a playfield with a pinball in the trough will eject that heavy steel pinball.
2) Remove the backglass / translite.
3) Open the backbox.
4) Identify which wiring harness comes from the playfield. Will have to lift the playfield to look.
a) In EM games, this is easy – there are usually one or two Jones plugs.
b) Early SS pins might have four plugs going into the backbox.
c) Later pins will have a wiring harness usually enclosed in a black flexible hose. Identify which plugs come from that harness. In a WPC (Williams / Bally) that could be 18 or more plugs.
5) Label the plugs.
a) Those that plug into a board, label the plug with the connector number.
b) Those that plug into another wire plug, just pick a letter and label both halves.

6) Unplug only those wires that come from the playfield.
7) Push the wires down into the cabinet (may have to cut a plastic tie).
8) Slide or lift the playfield. Insure that all the wires from the playfield are free.
9) Prepare the area where you are going to set the playfield (table or rotisserie).
10) Two people lift the playfield out of the cabinet and more to the new location.
 Note: If removing a playfield that is on a swivel like in the third photo above, it will be a lot easier to lift out if you first remove the sleeve that the game pivots on. This is a threaded sleeve that should easily back off the screw. The remaining screw has a much smaller circumference and can be slid out of the swivel bracket much easier. This type of mechanism is difficult to deal with. Perhaps having three people there is advisable.
Installing the Playfield on a Rotisserie

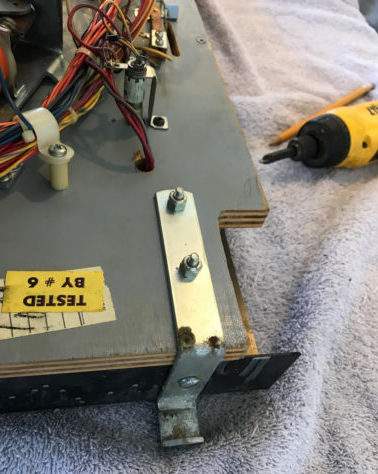
If using a rotisserie, remove the apron plus the two brackets that stick out at the front of the playfield (see above photo).
If your playfield has a wood or vinyl edge on the back, remove all but two of the wood screws holding it in place. The two remaining ones should be near the ends. Obtain wood screws that are slightly longer than the ones you removed (see suggested supplies in Part 1).
Note: Some use clamps to hold the playfield on to the rotisserie. We don’t. They loosen with time and a falling playfield is not pleasant.

Lock the rotisserie so that the “L-shaped” angle irons are horizontal. Using two people, place the playfield on the rotisserie. Line up the top (back of the playfield with holes in the angle iron so that three wood screws can be inserted into the empty screw holes holding the wood edge in place.
The bottom (player end) is more problematic. All modifications here will be hidden by the apron. Some games have holes drilled through at the edge (factory or previous owner) that we use. We have been known to drill two small holes through the playfield at the bottom to hold it onto the rotisserie. Otherwise, we use three 1/2″ #8 or #10 wood screws. These will not go through the playfield.
At this point, the playfield should be securely attached to the rotisserie. Now the fun begins!