A. Clearing the Playfield
1. Supplies Needed
2. Preparation
3. Clearing the Playfield
4. Removing the Ramps
5. Removing the Pop Bumpers
– Removing the Sling Shots
B. Cleaning the Playfield
6. Cleaning the Playfield
C. Repairing the Playfield (optional)
7. Playfield Repair
8. Fixing Inserts
9. Sealing Your Work
C. Rebuilding and Adjusting
10. Rebuilding the Mechanicals
11. Switches and Reassembly
12. Final Testing
This is a multipart series on how anyone can do a complete overhaul of your pinball machine and make it work like new.
Many of you likely skipped most, if not all, of steps 7, 8, and 9 which involve repairing the playfield. Those steps are not required for a tradition “shop of a pinball machine”.
However, we feel strongly, that all of the mechanicals should be rebuilt. This is not difficult and can be accomplished by anyone of any skill level who can use a screwdriver and Allen wrench.
To rebuild the mechanicals, it was necessary to purchase relatively inexpensive parts from pinball suppliers as outlined in Part 1 – Supplies Needed. These parts include coil sleeves, springs, pop bumper ‘skirts’ and other missing or broken parts (drop targets, switches, etc.) as needed.
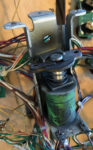
Rebuilding the Pop Bumper
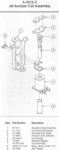
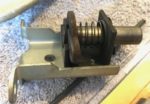
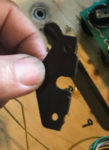
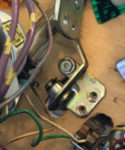
There is some variation in these parts, so your disassembly and reassembly might look like the parts in Image 1, or you may have a combination of parts like shown in Image 4 – disassembly and reassembly is similar and quite easy if done methodically.
The pop bumpers (also known as jet bumpers) have three major sections: 1) the solenoid below the playfield, 2) the switch, and 3) the parts above the playfield.
Note the orientation of the wires on the coil. When reassembling them, place them in the same direction.
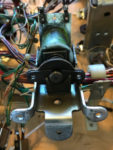
To disassemble, remove the two screws (part 8 in image 1) on the side that that hold the center coil retaining bracket (2) in place. It will then be possible to remove the coil and plunger from the bracket.
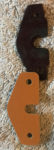
As the plunger comes out, there are four parts – don’t let them fall apart. These are a metal plate (part 3), bakelite plate (4), spring (6) and plunger (5). Note the way these come apart as that is how you will have to put them back together. Of those parts, the bakelite plate is the most likely to be damaged (image 5 is light damage). Replace it if required (new and old are in image 6). If not damaged, clean all of these parts with a rag and isopropyl alcohol. For a thorough shop job, replace the metal plate, bakelite plate and spring.
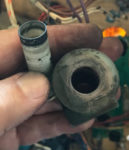
Clean the pop bumper bracket with the rag and isopropyl alcohol. Replace (or clean) the coil sleeve (image 7). Prior to replacing the sleeve, clean out the interior of the coil. Coils do not wear out. They will work nearly forever.
Inspect the diode (if present). Test it by inserting a screwdriver between it and the pop bumper, then lightly pry on it. If it is broken, it will pop off and will need to be replaced in the same orientation as original. Note that later games do not have a diode and most EMs do not either.
Inspect the wires. If the strands are broken, unsolder the wire, cut off the end, strip it and solder.

Reassemble the pop bumper. Note that the metal plate is on top and oriented towards the inside of the bracket, while the fiber or bakelite is underneath the metal plate and facing out (like it was in image 4), along with the spring. These fit inside the two sections of the coil retaining bracket (2). Insert this into the coil and onto the bracket stop. Attach the bracket onto the main bracket using the two screws. Getting this back together might require a little practice to get everything oriented and together properly. Make certain the wire tabs on the coil are facing in the direction they were originally.
Test the pop bumper plunger by pressing it down to insure that it moves smoothly and pops back up freely.
The lower pop bumper assembly has been rebuilt.
The final assembly of the pop bumper solenoid and switch has to be completed after the pop bumper parts above the playfield are re-installed.
Rebuilding the Slingshots

Slingshot rebuilding is similar to rebuilding the pop bumpers.
* Remove the nuts holding the solenoid underneath the playfield (Image 10).
* Remove the plunger and linkage from the playfield (5) (Image 11).
* Take note of the orientation of the coil. Disassemble the coil from the bracket (6d).
* Clean the plunger and coil stop with isopropyl alcohol.
* Replace the coil sleeve (or clean it with alcohol) (6f).
* Replace the spring if necessary (7).
* Inspect the coil plunger assembly (3). If there is play from the plunger to the connector, or the hole is out of round, replace this assembly.
* Remove the kicker crank assembly (2) from the mounting bracket (5) by removing the clip (1). Clean the parts with isopropyl alcohol. Lightly grease with silicon grease, light machine oil or teflon lubricant. Reassemble using the clip.
* Reinstall the kicker assembly, plunger and mounting bracket using the same screw holes.
* Reassemble the coil to the bracket with the wire tabs in the correct orientation.
* Inspect the diode (if present) and replace with 1N4007 if necessary. 1N4004 is OK.
* Inspect the wire connections to the coil. Unsolder, cut off the ends and strip the wire. If the wire appears tarnished, it will be necessary to shine up the wire with sandpaper or dremel brushes. Tin the wires and reconnect to the coil.
* Insert the spring on the plunger, then insert the plunger into the coil and reattach the coil bracket using the same holes in the wood.
Rebuilding the Flippers
This is the single most important step of ‘shopping’ a pinball machine. Unless you know when the flippers were shopped last, and it was recent, you should do this.
How to rebuild your pinball flippers.
Rebuilding Other Solenoids
 Pinball machines have other solenoids besides the flippers, slingshots and pop bumpers. All of them have some sort of mechanism to move the pinball into the shooter lane. On some machines, that is two solenoids. These should be disassembled and cleaned just like you did the slingshots and pop bumpers.
 Sometimes there are other solenoids like VUK (vertical up kicker), ball locks, etc. These get less use than the others, but while you have everything apart, take a little bit of time to clean them up.
You may have to unsolder the wires to the coils in some cases. If required, be certain to take photos showing which wire goes to the banded end of the diode. Also label that wire with masking tape.
Always inspect the condition of the wire and how well it is soldered to the coil. Also check to insure the diode is not broken (if present).