This article was originally posted on PinballRehab.com.
Reproduced with permission from terryb.
Written by terryb
A. Basic Soldering Tutorial
B. Basic Desoldering Tutorial
– Supplies Needed
C. Tools for Advanced Soldering
D. Advanced Soldering Tutorial
E. Advanced Desoldering Tutorial
This is part two of a five part series on soldering. This article is specifically oriented towards beginners and playfield desoldering. It covers desoldering tools, supplies and the skills needed to replace a diode, switch, solenoid or broken wire.
Advanced skills, better equipment and experience are needed before desoldering pinball circuit boards.
Desoldering Tools and Supplies
[Editors note: Prior to starting, read the section on Supplies Needed for Desoldering.]


Basic Desoldering Procedure
Solder wick when heated with the soldering iron tip will draw the solder away from the joint. Although solder wick (supposedly) includes flux always add some additional flux to the joint or the wick (liquid flux works well for the latter).
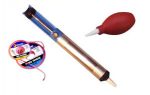
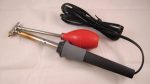
You can also buy squeeze bulbs for sucking solder, but they don’t work as well as the solder sucker. A Desoldering Iron with an attached bulb may sound like a good idea, the tip temperature is about 788 degrees, which is higher than what is needed to desolder.
Note: It does not take anymore temperature to desolder than solder (650 – 700 degrees).
Most beginners prefer the solder sucker over the solder wick, but it’s a good idea to get experienced with both since they each have specific applications as I will soon discuss.
You will also need a fiberglass pen, flux, needle-nose pliers and a slotted solder pick (see the Basic Soldering Tutorial for more info on these items).
See the references for an article on desoldering tools.
Cleaning the Joint

Oxidation occurs when oxygen comes in contact with metal, and the process is amplified by heat. The heat form your soldering iron will not conduct properly if a solder joint is oxidized. The more oxidation present–and it will be in a twenty some year-old game–the harder it will be to desolder.
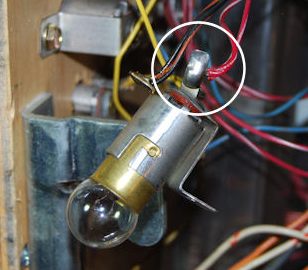
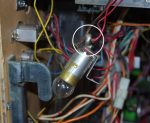
Removing oxidation is a two step process: mechanical and chemical. First use a fiberglass pen to brush the joint you are desoldering. See Image 1 prior to mechanically cleaning a solder joint and Image 2 for after cleaning. The metal should be nice and shiny after cleaning.
When soldering the solder provides flux to clean the joint. When desoldering, since you’re not using solder, you should always add flux to the joint.
Desoldering a Solenoid
I see a lot of people heat up a [solenoid tab] and then just yank the wire out. The problem with this approach is that solder will go flying and it does burn if it hits bare skin. I have also seen shorted switches caused by blobs of solder. [Editors note: We have also seen the tab ruined, diode broken, or the worst – breaking the coil wire off the solenoid tab.] You’re going to have to remove the solder anyways, so why not do it the right way.
To prevent these issues I use a two-step process utilizing both a solder sucker and solder wick. Feel free to modify my technique if you feel more comfortable with either the sucker or the wick.
If your solenoid wires are long enough, cut them off about 3/4 of an inch from the solder joint and do the desoldering on the bench. If you don’t have any excess wire just continue while working under the playfield. If it’s easier you can remove the solenoid’s mounting screws, although you will need to clamp it to something or you’ll need three hands to desolder the wires.
Clean the joint with a fiberglass pen and add some flux to it.
Using either a .125 or .187 tip on your iron, preheat it and then clean it as discussed in the Basic Soldering Tutorial. Apply the tip to the solder joint while maximizing the surface contact area between the joint and the iron’s tip. Wait about 1 second after the solder turns liquid, which should take 2 or 3 seconds, and then with the solder sucker in your other hand, remove the soldering iron, place the sucker on top of the solder and depress the release (see Image 4).
You have to get the solder sucker in place quickly, so get it within 1/2 inch of the joint before removing the soldering iron. You’ll hit the iron tip occasionally while doing the swap, but don’t worry about it, that’s why you bought extra tips.
Note: Anytime there is excess solder on the tip of the iron, wipe it off on your sponge. Also keep the solder sucker tip clear as described above.
Repeat as needed until the eye of the lug is at least mostly clear and the majority of solder has been removed. If you’re having trouble you can add a little flux. At this point you should have 90% of the solder removed and there should just be a thin film holding the wire in place.
Now while holding the loose end of the wire with a pair of needle-nose pliers reheat the joint. Straighten the wire into an L shape by bending it away from the lug (it was probably in a J or U shape when you started). Then push the wire towards the lug so the bottom part of the L will come straight out the eye of the lug and pull it out.
You can remove the diode at this point or wait till you’re on the bench, if you’re not already.
When removing the diode, heat the joint and then use the solder pick with the hook in it to grab the loose end of the diode’s lead and straighten it (again it was probably in a J or U shape when you started). If the lead is wrapped around the lug use the pick to unwind it. You can also cut off the diode before desoldering the leads and make your life easier.
Note: Do not pry up the diode, or anything else, using the soldering iron tip. You will damage it and shorten its life.
 I use solder wick to finish up since the last little bit is hard to get with a solder sucker. Add some flux to the joint and then place the solder wick on top of the joint and your tip on top of the wick (see Image 5). After a couple of seconds the solder should start to flow into the wick. Just slide the wick under the iron tip as to get to a clean spot as it fills with solder.
Once you’re done clean the lug with flux remover.
Note: If you’re having trouble removing the solder it sometimes helps to add a little fresh solder to the joint before desoldering. I know it’s counter-intuitive, but it does work. This is especially true with the solder sucker since it requires a certain amount of mass to work effectively. That’s why I finish up with the solder wick.
This same technique works with switches.
External Links
Basic Soldering Lessons – Not specifically pinball, but a nice video series.
Comments
Comments, including suggestions, improvements, errors, etc. are welcome (see below).
If you have a specific question about your game, please see our FAQ section.