Overview
This article was originally posted on PinballRehab.com.
Reproduced with permission from terryb.
Written by terryb
[Note: Some editing was performed to refer to the photos correctly. Some original photos could not be located.]
There are several techniques available when restoring damage to cabinet graphics. Which one you use depends on how the graphics where originally applied, the type of damage and the complexity of the graphics. The purpose of this article is to help you decide which is the best approach for your situation and link to the appropriate techniques.
This article is oriented towards major graphics repair requiring creating decals or stencils. For repairing cabinet graphics damage by painting with a brush or airbrush see this article.
Types of Cabinet Graphics
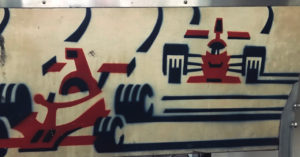
Many different types of graphics have been used over the years on pinball cabinets. Early EM games used stencils and later the industry moved to silk screened cabinets. Early stenciled games often exhibited over-spray as the decal was held slightly away from the playfield when the paint was sprayed.

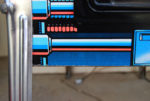
The next step was cabinet decals, although on many early games with decals the backbox was still stenciled or silk screened. Most cabinet decals are silk screened although some Stern games use printed decals. Many silk screened cabinet decals use dithering (small colored dots) to allow the viewer to perceive more colors than where actually used in the printing process.
With both stencils and silk screening (whether on the cabinet or on a decal) the colors are applied in a specific order to achieve the final result. In other words the entire cabinet might be painted white, then a stencil for the red areas applied and then a stencil for the blue areas applied. The last stencil, blue in my example, will paint over red and white areas.
Cabinet Stencils
Repairing Stenciled Cabinets
If you’re dealing with a small area or simple graphics, Frisket paper (masking film) is a quick, easy solution. You can also use static cling vinyl for small areas, especially if you’re concerned about lifting paint. Of course free-hand painting is always an option for small, simple areas.
Frisket film has a mild adhesive that will adhere to the cabinet and protect the areas you don’t want to paint. Then you just cut out the areas where you plan to apply paint with an X-Acto knife. The downside to this approach is that it takes a soft touch to cut the Frisket paper without cutting into the cabinet.
Note that you cannot recreate the over-spray look common on older games with Frisket paper or static cling vinyl. In this case you will need to create acrylic stencils and slightly space them off the cabinet when spray painting.
If you’re doing an entire cabinet, or the graphics are more complex, then it’s usually best to go with a stencil or silk screen. Stencils are typically made from thin mylar with an adhesive backing or acrylic sheets that can be held in place temporarily with a tack spray, and are re-usable.
In the case of silk screens you will need a sign shop to create them for you. A good application for silk screens is the warning label on the back of the backbox since these where typically silk screened.
Repairing Silk Screened Cabinets
Although some purists would argue, you can generally use the same techniques for a silk screened cabinet as for a stenciled cabinet.
Repairing Cabinet Decals
The choices available when restoring graphics on cabinet decals are paint, silk screen, water slide decals and vinyl decals (thicker than the water slide decals). For recreating an entire cabinet decal your best choice is a sign shop. [Or reproduction decals.]
Repairing Silk Screened Cabinet Using Decals
If the cabinet decal is in good physical shape and the graphics are fairly simple then paint is a good choice. This approach works well when dealing with cabinet fade where you just want to restore the original color. You can do this either free-hand or by making a stencil and spray painting.
Note: I much prefer sprayed finishes over brushed.
If the cabinet decal is in good physical shape and the graphics are complex or dithered then you will have to go the decal route.
Water slide decals are very thin and invisible at normal viewing ranges. They should be used when the cabinet decal is in good physical shape. If the cabinet decal has been damaged to the point where it needs to be cut away, then vinyl decals are the best choice. Using thicker decals allows you to match the surface level of the surrounding decal.
The Graphic Repair Process
Following is the general process used when restoring cabinet graphics with links to articles that provide in-depth information on each step.
- Prep the surface.
Whichever technique you use to repair the graphics the results will be disappointing if the surface area is not properly prepared. This will be covered in the appropriate articles referenced under “Create and apply stencil, silk screen or decal.” - Copy graphics.
This can be done manually with Frisket paper, vinyl cling static, tracing paper or sheet acrylic. These choices are all appropriate for simple non-dithered graphics (see this article). For more complex graphics or dithered graphics you will need to recreate the graphic using a camera or scanner (see Recreating Cabinet or Playfield Graphics). - Edit graphics.
If you’re using a camera or scanner you will need to clean-up the graphics image before printing a decal or creating a stencil or silk screen. See Editing Graphics with Bitmap Software (needed for decals and hand-cut stencils) or Editing Graphics with Vector Software (needed for stencil or silk screen, but will also work for decals). Note: There are free online services that will convert a bitmap graphic to vector. - Match colors.
Probably the most challenging part of the process is matching paint. See Matching Paint Colors for info specific to painting, stenciling, printing decals or using a sign shop. - Create and apply stencil, silk screen or decal.
In the case of stencils you can either buy a plotter/cutter or have a sign shop or online service create your stencils from a vector image (see this article for more information on creating stencils). For silk screens you will need to either use a sign shop or an online service (see this article for more information on creating silk screens). For small decals you can use either water slide decals (see Creating and Applying Water Slide Decals) or vinyl decal paper (see Creating and Applying Vinyl Decals). For larger decals you will need to use either a sign shop or an online service (see this article for more info).
Comments
Comments, including suggestions, improvements, errors, etc. are welcome (see below).
If you have a specific question about your game that does not directly apply to restoring pinball cabinet graphics, please see our FAQ section.
Thanks for this guide! Super helpful
I have a cabinet that I want to airbrush a few parts of due to faded paint and a few bits of damage. Part of your article mentions airbrushing to repair the graphics, but there doesn’t appear to be a link.
“This article is oriented towards major graphics repair requiring creating decals or stencils. For repairing cabinet graphics damage by painting with a brush or airbrush see this article.”
Is this supposed to point to the airbrush page(s) for playfield repair? Or something else?
A good question. This article was originally posted on another site that, eventually, ceased to exist. The original author consented to posting it here. We will need to research to see if we missed a page.
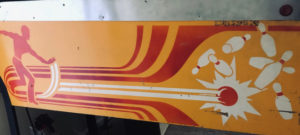
As to your cabinet, most faded ones are one giant decal and it is usually the red or orange that fades. We have never tried to use an airbrush to repair that damage as the original was printed. We are not sure that would work as the material used for the decals do not absorb paint well.
However, if you are touching up a cabinet that was originally painted using stencils, an airbrush would work just fine. In our experience, they do not usually fade, or if they do, they are scratched and dented. We remove the paint, fill, sand, prime, then repaint using stencils.
https://homepinballrepair.com/pinball-cabinet-restoration/
https://homepinballrepair.com/pinball-cabinet-restoration-painting-with-stencils/
We are curious as to what you are trying to do.
There is information here on using an airbrush to repair a playfield.
https://homepinballrepair.com/using-an-airbrush-on-a-pinball-playfield/