A. Clearing the Playfield
1. Supplies Needed
2. Preparation
3. Clearing the Playfield
4. Removing the Ramps
5. Removing the Pop Bumpers
– Removing the Sling Shots
B. Cleaning the Playfield
6. Cleaning the Playfield
C. Repairing the Playfield (optional)
7. Playfield Repair
8. Fixing Inserts
9. Sealing Your Work
C. Rebuilding and Adjusting
10. Rebuilding the Mechanicals
11. Switches and Reassembly
12. Final Testing
This is a multipart series on how anyone can do a complete overhaul of your pinball machine and make it work like new.
On this section, we are removing ramps and other ‘toys’ from the playfield. If your playfield does not have ramps or other items, pleases skip onto part 5.
Note that not all sections may be necessary with all playfields. For example, if there are not any problems with the inserts, you can skip that section. If not repairing the playfield, the touchup and sealing sections can be skipped.
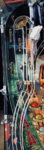
Locating and Unplugging the Wires to the Ramps
Ramps usually have switches, lamps and even other items attached. These require wires going down below the playfield. Usually these wires usually snake through a cut-out in the plastic and through a hole below. These plugs can sometimes be plugged into the wrong connector. So we always label them (letter ‘A’, ‘B’, etc.) with a Sharpie or another permanent marker, prior to unplugging them.
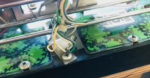
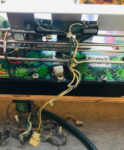
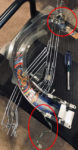
In the above photos, Photo 1 shows a ramp with the wire traveling through a gap in the playfield plastic, through a hole in the playfield and below. Photo 2 shows the wire unplugged, pulled through the plastic and the playfield is ready to be removed.
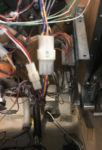
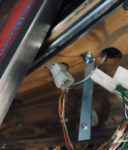
Photos 3 and 4 show other plugs under the playfield. Photo 5 shows a removed ramp with the two sets of wires connected. Be certain to label both sides of the plug prior to unplugging.
Once all the wires to a ramp have been unplugged and brought up above the playfield, the ramp is ready to be removed.
Removing the Nuts, Screws, etc. Holding the Ramp In Place
There are always a few items to hold a ramp in place. Many of them are obvious but others are hidden.
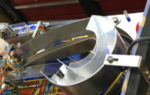


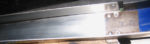
Photos 1 & 2 show some of the obvious connections holding a ramp in place. Photo 3 may look like those screws are holding the plastic in place, but those screws also go though to posts below the ramp.
Photos 4 & 5 show some of the common type – Phillips wood screws mid-way down a ramp, holding it attached to the playfield. These are fairly easy to remove, a bit harder to reinstall.
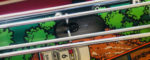
Many of the ramps terminate to an in-lane just above the flippers. These are frequently attached to the slingshot plastics as seen in Photos 6 & 7 – and you may have removed these when taking those plastics off. These attach to a post holding the plastic post in place underneath the plastic. That is why we emphasize making sure you know which post goes in where. Photo 7 is one of our least favorites as we found we had to use a box wrench to remove the nut hidden under the upper layer of plastic.
Photo 8 is less common. This is where the ramp is attached to the playfield by to nuts underneath the playfield.
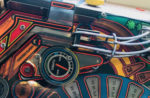
Photo 9 is more common. There are two small Phillips wood screws holding that end and flap in place. These screw holes are frequently too large to hold the screws and will require repair. Also, when reinstalling, many people tighten these screws too hard, which creates a ‘dip’ and sudden rise in the ramp, causing the pinballs to become airborne. Prior to taking apart, study how the ramp has a gently increasing upwards slope.
As with before take a photo before doing anything, then remove the screws / nuts, etc. and place those parts near the spot removed, then put those parts in your storage area. Remember, organization and phots are the key to putting this all back together.
All Ramps Removed
As the ramps are removed, set them aside, well out of the way. We will clean them up later, in section 11.
As ramps are removed, there will be more playfield items to be removed. These may include some more playfield plastics. They are removed in the same manner you did this around the slingshots and other plastics.
The last part to be removed are the pop bumpers (or thumper bumpers as some companies called them). They are the most complex part to be removed, and we will cover this next.