The old plasma displays used in pinball machines burn out. Usually, it is the display itself that goes bad. Unfortunately, these displays used in early solid state (SS) games are not available anymore. Fortunately, several manufacturers make replacement LED displays. They are not cheap as a set can cost $150 to $300. The more expensive ones have brightness controls that make machine existing plasma displays easier.
There are many advantages to replacement displays.
- They do not require the problematic high voltage to operate.
- They last longer and do not burn-in like plasma displays.
- They slide in just like the original displays and connect to the same plug as the original.
Some can replace a single display, while leaving the old displays in place. Others may require the entire set to be replaced. See the manufacturer for specifics.
If replacing all displays (recommended), then be sure to remove the fuse in your power supply for the high voltage section with the power off and unplugged from the wall. Always remove the fuse located near the transformer. Some games have a second high voltage fuse in the driver / power supply board. It is fine to remove that one too, but important to keep that potentially deadly voltage from getting out of the transformer area, so first, remove that fuse next to the transformer.
Suppliers
LED (and sometimes LCD) displays are available for essentially all pinball machines from many different suppliers. Some are available fully assembled and are ‘plug and play’. Others are available as less expensive kits that require some assembly.
DMD displays are also available for more recent Williams / Bally WPC games as well as DE/Sega/Stern plus Gottlieb games.
Games such as early Bally / Stern, us 5 (or more) separate displays. It maybe possible to replace one burned out plasma with a LED display. Matching the existing plasma displays are not easy (X-Pin specializes in this), so it is usually wise to replace all displays at the same time.
Williams 3 – 7 games use a master display and four ‘slaves’. Those must be replaced as a set.
Alpha Numeric Suppliers
Pinscore – Great displays fitting most pinball machines.
X-Pin – One of the earliest. High quality assembled displays built to match the originals.
Rottendog – Available only from parts suppliers.
PinLED – A European supplier of LED Displays.
Pinitech – For early Bally / Stern pins. Specializes in matching the look of the originals. Kits available.
Wolffpac – Inexpensive kits for early Bally / Stern, Williams 3 – 6, 7, 9 and 11, plus Gottlieb 6 digit.
Wolffpac has introduced kits, which have a low price point. They are also available assembled for a small fee. All of these displays are pretty simple to assemble and put together. We recently did a kit for a Williams 3 – 6 pin and found it easy to do for those familiar with soldering. We highly recommend them for those who are experienced solderers.
DMD Suppliers
As of this writing, standard 128 x 32 DMD plasma displays are (surprisingly) still available from various sources like Marco, Pinball Life, K’s Arcade, and others for around $225 or so. Getting the larger 192 x 64 or the smaller 128 x 16 plasma display used in some DE / Sega games can be difficult if not impossible. Thankfully, LED and LCD displays are becoming available.
LED or LCD displays for DMDs replacing plasma, as well as Stern are available from Marco, and other suppliers. But an increasingly popular if expensive option is a ColorDMD replacement. These are available for the standard 128 x 32 plasma displays as well as the larger 192 x 64. ColorDMD makes the custom conversion software for each game.
For DIY’ers, there is also Pin2DMD. This may require significant research and colorized versions of many games are not available. Information here, here, and here.
Installing X-Pin In Early Bally / Stern
These photos show X-Pin displays, although Rottendog and PinLED show some similarities. Rottendog use through hole components and include a circuit diagram which may make them easier to repair. Because of their price, we have recently used many Wolffpac displays.
This is intended as a general guide. Prior to proceeding, consult the cautions on the home page. Always consult the manufacturers instructions prior to installations and follow those first.
Click on these photos for a larger picture.
 The display may arrive in a bubble wrap like this. Carefully cut the tape holding it together. Many of the displays do not have the translucent piece of plastic.
  This package comes with two boards (in the bubble wrap), a translucent piece of plastic, a foam ring, and a package containing brackets. Note: Not all displays have these metal brackets to connect the two sections. Many of the boards are held in place by just the pins between the two boards.
  Unwrap the LED board. Locate the brackets and plastic tabs. Connect the brackets to the circuit board as shown. Note, the manufacturer shows the tabs installed in the opposite direction, but this worked better for me.
  After both brackets are installed, swing them so that they face down to make the next step easier.
  Carefully insert the pins from the LCD board into the bottom board. Be careful that all pins are entering the connector properly.
  Carefully press down on the top of the LED board until the pins are completely inserted into the bottom board.
 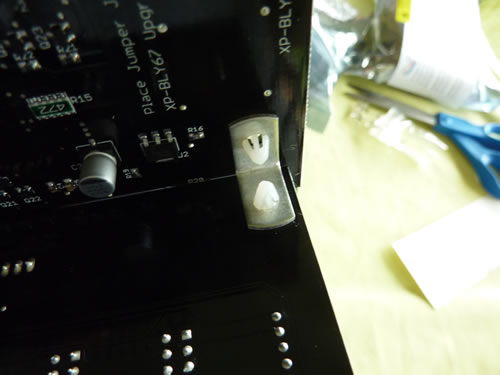 Connect the brackets (if supplied) attached to the LED board to the bottom board using the same plastic connectors. Make certain that the “legs” are all the way through. During this process, be careful not to stress or flex the two boards to prevent damage to the connectors between the boards.
  The assembled display board. The two boards are at right angle to each other (this photo makes it look a bit off of right angle).
Attach the foam around the LED displays.
 Place the translucent cover (if supplied) over the display. This will give the display a “like the original” look.
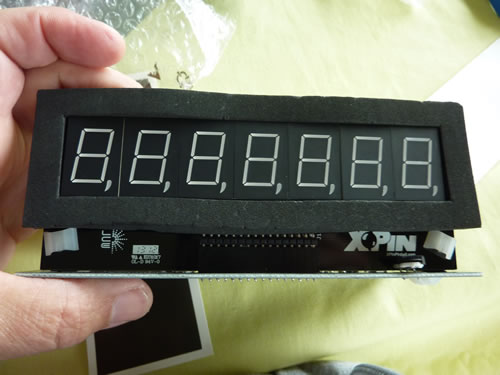
 This is the assembled display. Note the brightness control in the lower right (not on all displays from all suppliers).
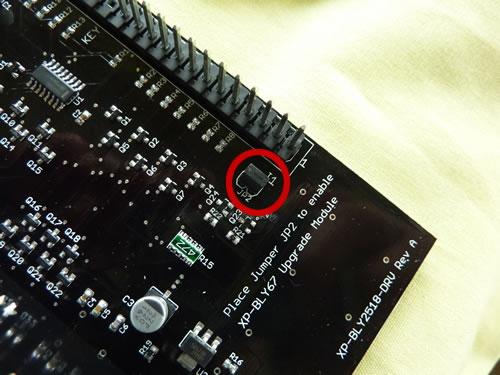 Check your board for the presence of jumper JP2. Contact the manufacturer if yours is in place. In our application, the Eight Ball Deluxe pinball machine would not boot after installation. Removal of this jumper fixed the problem.
 This is the board with the JP2 jumper removed. There is a second jumper that controls the displays of commas. Do not remove or install jumpers with the power on.
Caution
Installation and working with these new displays must be done with the power off. It is highly recommended that the fuse to the high power be removed from the power supply. Installation should be done only by qualified personnel.
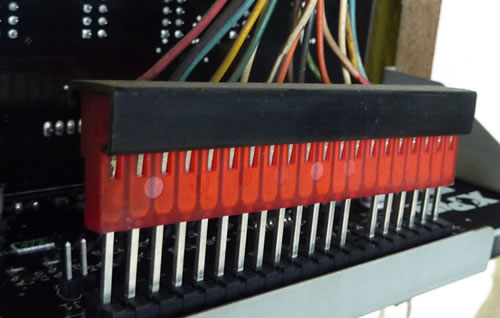 This is the display being installed. Note to carefully place the connector over all of the pins. There is one pin missing. That is the key and it aligns up with a solid key on the wire connector so that it cannot be installed incorrectly.
 After the display is installed, make certain that it is pushed all the way to the rear of the holder. Otherwise, the display and backglass may come into contact and damage one or both. Be certain that the plug is all the way down.
 This is the display installed and operating. Note the brightness control on the lower right (not on all displays). This control allows the brightness to be adjusted to match the other displays and look like the original.
Comments
We are always looking for comments, including suggestions, improvements, errors, etc. for this page (see below).
If you have a specific question about your game that does not directly apply to this page, please see our FAQ section.
Last updated 05/19/2020. Copyright 2006 – 2020, all rights reserved.