1) Good Readings?
2) Test Setup
B. Types of Flipper Coils
1) Parallel Coil
2) Serial Coil
C. The Diodes
D. Test Results
E. External Links
It is easy to test a solenoid coil by using a voltmeter set to resistance. All that is required is a voltmeter that reads resistance and a little bit of patience.
For three tab flipper coils, see the flipper coil section. For all other coils (two tabs) see the two tab section.
How To Test
What Is A Good Reading
There are two ways to determine the correct reading:
* Test another identical coil on your machine.
* Look up the correct value in a coil chart here, here, or here.
Note that the value you read could be off a little bit. For example, with a dual winding flipper coil, if the power winding value should be 4.2 ohms and you get 4.6, the difference is likely due to your meter. On the hold winding, the value might be something much higher, like 250 ohms. If yours is 230, it is likely still good.
A bad value would be near zero (shorted), or well below the reading, or close to infinity (broken wire).
If reading near zero, it could be that the diode is shorted, so remove the diode prior to replacing the coil. If it is infinity, look closely where the wire comes out of the coil and look for a break. It maybe possible to pull a little wire out of the coil and re-solder it to the tab. It is also possible that the zero reading is due to a problem elsewhere in the machine. It maybe necessary to unsolder one of the two wires coming into the coil.
And don’t forget, this test must be run with the EOS switch contacts pulled apart, or a piece of paper inserted between the contacts.
The tough calls are when it should be 250 ohms and you get 200. That could be a coil that was overheated and now there is a short within the winding.
Preparing for the Testing

Set your voltmeter to resistance. If the meter has an Auto setting, you can leave it on Auto. If not, set the resistance to x1 or the lowest reading. Your meter must be able to read down to about 0.2 ohms or it will not work for this test.
Touch the two leads together and note the reading. It should be very low, perhaps 0.2 ohms or less. If it is much higher than that, reinsert the leads into your meter, twist back and forth and try again. If the reading stays high, such as 2 ohms or higher, your leads or meter are defective. You can still try this test, but the power coil reading will be off. Note that you must put a piece of paper between the EOS contacts (see the red circle – lower right of photo).
Flipper Coils
All flipper coils except recent later Data East / Sega / Stern coils have three lugs. One is for the initial power and the other is for the ‘hold’ stroke. For Data East / Sega / Stern two tab coils, see the two tab coil section below.

There are two types of flipper coils. To check the coil, determine which you have. A parallel coil has two wires going to an end tab. One if a thick wire and the other is thin.
Look carefully, as the thin wire is sometimes hidden by the thick wire.
A serial coil has a thicker wire and a thinner wire. The difference maybe difficult to notice. But two wires are soldered to the center tab.
Identify which flipper coil you have and advance to that section.
Parallel Coils
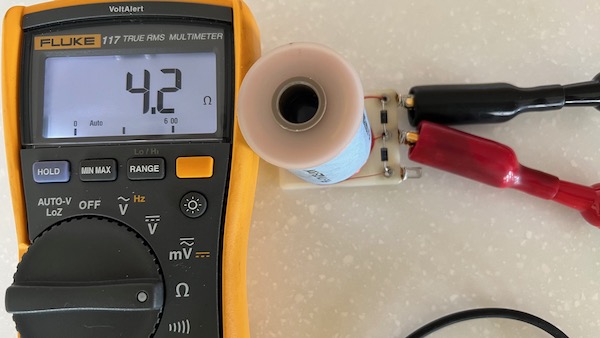
For the Serial Coil attach one lead to the top tab (see photo). Attach the other lead to the center tab. The reading should be fairly low, generally in the 4 ohm region for the power winding. This varies depending on the coil.
This is a 11620 coil. According to the table, the value should be 4.0/133.0 ohms. So the 4.2 is reasonable since the leads could add 0.1 – 0.3 to the reading.

To test the hold winding, attach to the top and bottom tabs. The value should be in the 100 to 150 ohm range. The spec is 133.0 ohms, so this coil is good.
If it is out of spec, see the Good Readings section to troubleshoot.
Serial Coils

For the Serial Coil attach one lead to the center tab (see photo). Attach the other lead to the top tab. The reading should be fairly low, generally in the 2 – 3 ohm region for the power winding. This varies depending on the coil.
This is a early Stern 25-475 coil / 34-4500. This is not listed in the table. The 25 indicates the size of the power winding wire and the 475 is the number of turns of wire. There is a 25-500 /34-4500 listed, so that should be close, but a little higher. It is listed at 3.3 ohms, so 2.9 is close enough and this coil is good.
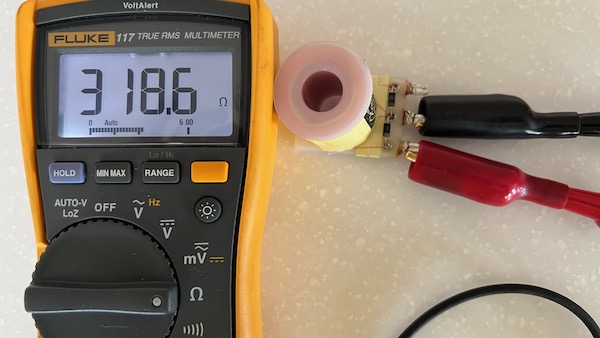
Leaving the one lead on the center tab, move the other lead down to the bottom tab with the fine wire. This reads 318.6 ohms. The 25-500 /34-4500 has a value of 350. Make sure that the EOS switch contacts are held apart.
While this reads a little bit higher, the difference is small enough that it will work. The hold value just has to be high enough to provide enough power to hold the flipper up, but not so low as to burn up if the flipper button is held in.
Both windings of this coil are good. If it is out of spec, see the Good Readings section to troubleshoot.
Other Coils &
Flipper Coils With Two Tabs
All other solenoid coils have just two tabs. Computer controlled Data East / Sega / Stern flippers have just two tabs too. These are just a straightforward resistance reading across the two tabs.
Be sure to look up the correct resistance value prior to testing and setup your voltmeter properly.

On some games, it maybe necessary to disconnect the plug that connects these coils to the driver board. But in most cases, that will not be needed.
Connect the two leads to the tabs and note the resistance.
According to the value in the Coil Resistance Chart, this coil should read 34.1 ohms. So this coil is good.
The Diodes
If there is a diode on this coil, make sure that the wire connecting the diode is not broken. Insert a small screwdriver between the diode and the coil and pry lightly. If it is broken, replace the diode. Make certain that the new diode is oriented in the same direction – look at the marking on the diode.
If the coil tests near zero, the diode maybe shorted. Remove it and retest.
What if the Coil Test Bad?
If the coil tests near zero and is a flipper coil, be sure that you have opened the EOS switch. If it still reads zero, clip off the diode and retest. If it is still near zero, then it is defective – recycle the valuable copper.
If it is low, but not zero and you have a flipper coil, make sure the EOS switch is open. If it is still low, clip the diode. Still low? It was likely overheated and partially shorted. Recycle the copper.
If it is high or near infinity, the wire maybe broken. Inspect the wire near the tabs. If you are lucky, you maybe able to get some more wire out of the winding and reattach it to the tab.
Additionally, see the Good Readings section to troubleshoot.