Recreating Playfield or Cabinet Graphics
This article was originally posted on PinballRehab.com.
Reproduced with permission from terryb.
Written by terryb
[Note: Some editing was performed to refer to the photos correctly. Some original photos could not be located.]
This article will walk you through duplicating cabinet or decal graphics using a camera or scanner. Both approaches can be used to create either decals, stencils or silkscreens. Although I should add that you can get a good VuPoint Magic Wand Scanner for under $100 and the scanner method will be more accurate than the camera method.
For more info, see Restoring Cabinet Graphics – Overview, which covers the different types of pinball cabinet graphics and provides an overview of the restoration process. Links are then provided to individual articles (like this one) that cover each step of the process. All of the detailed articles are also included in the Related Articles at the bottom of this page.
Skip to Duplicating Graphics with a Scanner.
Duplicating Graphics with a Camera
Two problems arise when using a digital camera to copy graphics. While a scanner will generate an image of the correct size and perspective a camera will not. So we need to use a photo grid to size the image and remove the distortion caused by the distance and angle of the camera relative to the image. We also need to ensure we get a photo of high enough quality.
Camera Resolution
The following table will give you the maximum size area you can photograph with various megapixel cameras and get a 300 DPI image.


- 5 megapixel — 8.6 x 6.5 inch
- 7 megapixel — 10.2 x 7.7 inch
- 10 megapixel — 13.6 x 9 inch
- 16.6 megapixel — 16.6 x 11 inch
In order to maintain this high a resolution you will often have to take multiple photographs (cabinet side decal, for example).
Taking Photo(s)
All photos should be in similar lighting, the same plane and perpendicular to the graphic. If you’re taking multiple photos, be sure they overlap so you can reassemble them later in your graphics editing package.
It’s best to use a tripod placed 1-2 feet from the graphic and keep the camera on the same plane and perpendicular to the center of the image. If possible do not use the camera’s flash or you will get a reflection off the surface. Natural light will give you the best color matches anyways.
If you are printing a decal, and want to get the best color match place a pure-white sticky white dot (available at office supply stores) in the photo area (over a solid color so you can fill it in later). In most cases there will be black in the photo, but if not you can also add a pure-black dot.
You can download the photo grid from REEL Pinball or create your own. Note: Print the photo grid out with a graphics editing program like Paint [Editor: Photoshop or Gimp will also work] since it will not be the correct size if printed from a browser or Microsoft Photo Viewer.
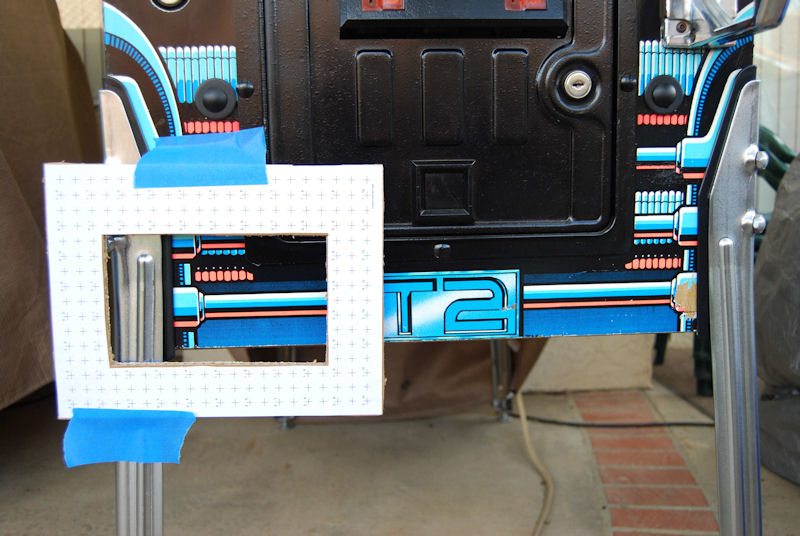 Cut a hole in the grid to make a frame that will fit around the area you are shooting. You can also cut the grid to fit around other playfield objects but make sure 4 cross-hairs, which form a rectangle, are visible. In Image 1 you can see the grid taped in place on a Terminator 2 cabinet.
Note: From this point on I’m working with an image from the front cabinet on Bram Stoker’s Dracula.
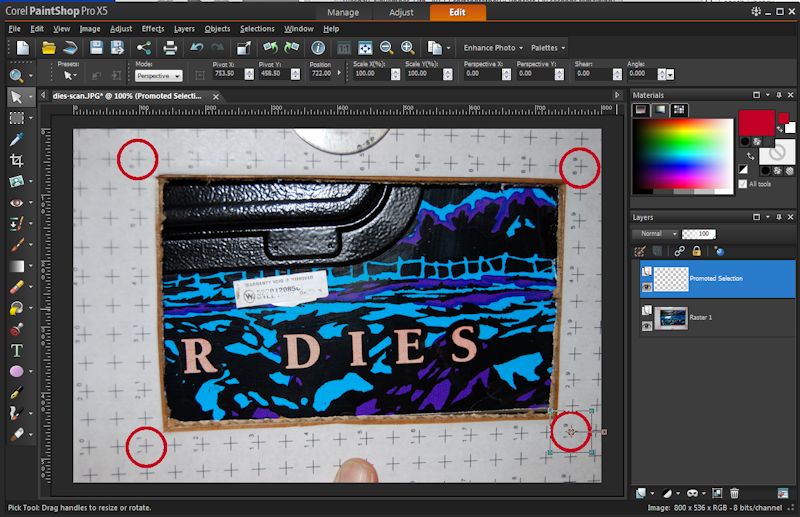 In Image 2 I have highlighted the four cross-hairs in red and you can clearly see how the right side of the rectangle on our photo grid is shorter than the left side. This is the camera distortion we will be removing with PaintShop Pro (most graphic editing programs will have a perspective correction tool).
Correcting Perspective
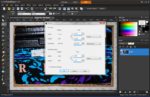
 Open the graphic in PaintShop [Editor: Or Photoshop, or Gimp which work similarly] and select the perspective tool. This will bring up a rectangle where each corner can be dragged around the screen. Grab each corner of the perspective rectangle and drag it to each of the four cross-hairs (see Image 3).
 Zoom in to get a perfect alignment on each cross-hair as you adjust each corner of the rectangle. Click on apply, and as you can see in Image 4 the cross-hairs are now aligned horizontally and vertically and both sides of the photo grid are the same height.
Depending on how well you aligned the camera the image may be slightly rotated, but that doesn’t matter for our purposes. You can always rotate the image if it bothers you.
 The last step is to crop our image and set the print size. Using the selection tool, select the four cross-hairs we used previously. Zoom in before making the selection so you can accurately position the rectangle on the four cross-hairs. Select the upper left cross-hair (see Image 5) and then drag the selection tool over the bottom right cross-hair.
 Select copy and then paste as a new image. The new image is 8″ wide and 5″ in height (use the numbers on the photo grid to determine the size of your image). Select image and then resize and change the print size to the appropriate size for your image (see Image 6).
It’s likely you will not get the height and width to match exactly. In my case when I selected a width of 8″ the height came out to 5.058″ (the software sets the height automatically since the aspect ratio is locked). This can only be fixed by unlocking the aspect ratio and setting both width and height seperately. Of course this will cause other problems so we’ll call 5/100 of an inch close enough.
You can now copy a portion of the image and paste as a new image (for example, the word LOVE in my case) and the software will adjust the print size for the new image accordingly.
At this point you can continue editing the image to create a decal or stencil (see references).
Scanners
The best way to recreate detailed pinball graphics is with a wand type scanner. Wand scanners provide a much cleaner image than a camera and do not induce perspective problems. Therefore the image is much easier to work with and requires less processing.
I got the VuPoint on sale for $75 and it will scan at 300, 600 and 900 dpi. I have not tried other brands, but they are all priced under $100 and work similarly. I have found 600 dpi more than sufficient for creating decals or stencils.
The VuPoint, as do most of the wand scanners, uses a microSDHC card that plugs into your computer to download the image. There is no other software required.
Note: Do not expect get exact color matches with any scanner. You will have to adjust colors for your printer anyway.
[Editors note: We use the Doxie Flip scanner. We have found that wands are technique dependent since the user provides the scanning motion. Since the Doxie has an internal motor, the scan size is essentially exact. However, the colors, especially the yellows, tend to come out more brown. The Doxie also has a fixed screen size which limits the size scanned, although stitching software (included) can put together smaller scans into one large scan.]
Duplicating Graphics with a Scanner
The good news is that recreating graphics with a wand type scanner (see references) is a lot easier since it will track the image size and will not create perspective problems.
See the note above about using a white and black dot if you are creating a decal. Although many scanners will go higher than 300 DPI, it is really not necessary and creates very large files. If you can select the type of file the scanner saves the image to, TIFF is the best choice.
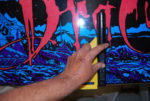
 Just turn on the scanner (see Image 7), push the scan button and slowly move it across the area to be scanned. It does take a little technique though. If you go too slow it will stop scanning and if you go too fast a red error light will come on (indicating you won’t have a good scan).
My first attempt on the cabinet side decal on a Bram Stoker’s Dracula took me about 10 tries to get a good scan. Once I got the hang of it, I rarely get a bad scan, even on a large area.
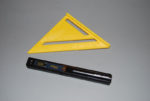
 For small areas, just push the wand along with your hand in the middle so you keep both sides of the wand moving along at the same speed. For larger areas where it’s easy to wiggle the wand while scanning I use a rafter angle square (shown in Image 8).
The base of the square has a small lip that can be placed under the edge of the cabinet and then slid along (see Image 8). Or you can set up a 2×4 along the side of the cabinet, or top of the playfield, and then place the base of the square on the wood and slide.
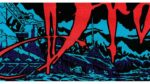
 Remove the SDHC card and after moving the image to your computer, continue editing the image to create a decal or stencil (see references). Note: The print size will be set automatically. In Image 9 you can see a portion of the scan I did on the Dracula cabinet.
Cabinet Decals
If you’re making entire cabinet decals, there are several choices. For backbox decals a magic wand will work fine although you will have to remove any carriage bolts to get a good scan.
For side cabinet decals you can use a wand type scanner but you will have to make multiple scans and then piece them together using your graphics program. Make sure you have a couple of inches of overlap on your scans if you use this approach. Any carriage bolts, plus the siderails, will have to be removed.
If you need an exact scan the best way to go is find a shop that has a Cruse Scanner, which will scan the cabinet side in one pass. Here’s a list of companies that use the Cruse Scanner.
Comments
Comments, including suggestions, improvements, errors, etc. are welcome (see below).
If you have a specific question about your game that does not directly apply to restoring pinball cabinet graphics, please see our FAQ section.
Is there any machines besides a “cricut” that could be used to interface with a scanner to make stencils? I am thinking about repainting my Gottlieb Pinball Pool play field. I am a do it your selfer, and am trying to creat my own stencils. Any info would be greatly appreciated.
Thanks for the question, James.
Unfortunately, we do not have sufficient experience to make an educated suggestion for you. The closest we have gotten to is using clear frisket paper, then manually cutting out the area to be painted. Please see the following page.
Perhaps one of the visitors to our site might be able to help you out?
Please let us know how it works out for you.
The HomePinballRepair Team
https://homepinballrepair.com/using-an-airbrush-on-a-pinball-playfield/
Hi,
I’m desperately looking for a scan of the bram stocker’s dracula playfield.
The pictures in the present post tend to say that you may have one.
Is there any chance you could provide it?
Thanks in advance!
Regards
Nicolas
I am sorry, but we do not have that game here. Are you seriously looking for a scan of the entire playfield?
Hi,
Thanks for the reply.
Yes, I am looking for a scan as I can’t find any playfield overlay. I would make it printed accordingly.
I am currently about to launch some tests on 3Dcnc so as to be in a position to machine a brand new playfield o’ which I would stick the overlay.
Are you in touch with the person who scanned that BSD playfield, reference made to the above pictures ?
Thanks!