Editing Pinball Graphics with Bitmap Software
This article was originally posted on PinballRehab.com.
Reproduced with permission from terryb.
Written by terryb
[Editors notes are contained within brackets.]
Once you’ve copied a pinball graphic using a camera or scanner (see references for how to do this) it’s time to create a final graphic for publishing. While some will skip the editing step, you are going to get a much more professional looking product with a little work.
For these examples I’m using Corel PaintShop Pro X5 (a bitmap, or raster, editing program). It has a very slick tool called Find All Edges which makes the process about 10 times faster than doing it manually (of course you do give up some accuracy). If your graphics package does not have an equivalent function, or Find All Edges does not provide good results, you can manually edit the image.
[Editors note: Example of other bitmap software include these programs.]
For more info, see Restoring Cabinet Graphics – Overview, which covers the different types of pinball cabinet graphics and provides an overview of the restoration process. Links are then provided to individual articles (like this one) that cover each step of the process. All of the detailed articles are also included in the Related Articles at the bottom of this page.
Bitmap or Vector Graphics
Whether you use a bitmap or a vector graphics editing program depends on your final objective and to a lesser degree your personal preferences.
If you’re sending the final graphic out to a shop to have a stencil or silkscreen made you will need a vector file. If you are going to print out the graphic and then hand cut a stencil then you can use a bitmap or vector file. For creating decals you can use either a bitmap or vector file.


While vector software tends to be more expensive and has a higher learning curve, it is much faster than doing the same job with bitmap software. See Editing Graphics with Vector Software for more info.
Some graphics packages, like PaintShop Pro, allow you to add a vector layer on top of a bitmap image. You can then trace the image using vector tools. I will cover this approach in more detail in the vector software article referenced above.
It is beyond the scope of this article to cover every aspect of bitmap graphics editing but rather to provide a few tips and pointers that will make creating final graphics for stencils, silkscreens and decals much easier.
Assembling Multiple Images
For larger graphics, like a cabinet side decal, you will often have multiple images that need to be combined. If you are using Adobe it has a “PhotoMerge” tool that does a pretty good job of putting images together [see this article for more info – page 364].
If your software package does not have an equivalent function you can import each image into a different layer (start out with two images). Set the opacity of the upper layer to 50% and then move the upper layer around until it lines up. Combine the layers and then import your next image (if needed) into another layer and repeat the process.
File Formats
Always work with TIFF (set compression to 0) or the native file type [PSD for Photoshop, XCF for GIMP, etc.] used by your photo imaging software. The problem with other file types (JPEG, GIF, etc.) is that they are compressed, which causes pixilation and artifacts.
Also GIF files are limited to 256 colors, Bitmap files do not store size information and JPEG files are anti-aliased (see below).
[Editors note: More information that you will ever want to know about file formats.]
Dots per Inch
Always work in 300 DPI. Any lower any you will get noticeable degradation in the graphics quality. Anything higher is not really necessary.
Do not intermix images with different resolutions. If you drag a 200 DPI image into a 300 DPI document the imported image will be smaller than expected.
Anti-Aliasing
 One of the inherent issues with a camera or scanner image is that it will be anti-aliased. This is the blurring of the transition where two colors come together (see Image 5, where the red area meets the black area). Pinball graphics are typically made with a stencil or silkscreen, which provides a well defined border between colors. So while editing the image we need to remove the anti-aliasing to create a more original look.
If you save your file as a JPEG it is automatically anti-aliased so always work in TIFF or whatever file format is specific to the software you’re using. This will prevent accidentally undoing a lot of hard work.
Find All Edges
 PaintShop Pro X6 (it is also included in some earlier versions) provides a neat tool called “Find All Edges”. A large majority of the time you can use this feature to quickly create a semi-final graphic.
[Editors note: GIMP, Pixelmator Pro, and Photoshop have a similar feature. After some experimentation, we have found that we love Pixelmator Pro. It does almost everything that Photoshop does and its interface and work flow is more similar to Photoshop than GIMP.]
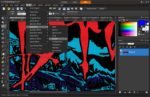
 Open your graphic in PaintShop Pro and then select Effects -> Edge Effects -> Find All (see Image 1). The software will convert your image to gray scale and separate the foreground and background colors (see Image 2). There will be a 1 pixel gray border around each area.
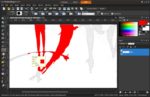
In my example (Bram Stoker’s Dracula) I’m creating a stencil to repaint only the faded red area. So next I used the eraser to remove all of the other areas and then selected the background white color with the “Magic Wand” (more on this later). I then chose Selections -> Invert to make what will become my red areas active (the reason for this two-step approach is to include the 1 pixel gray border in the area I’m painting red).
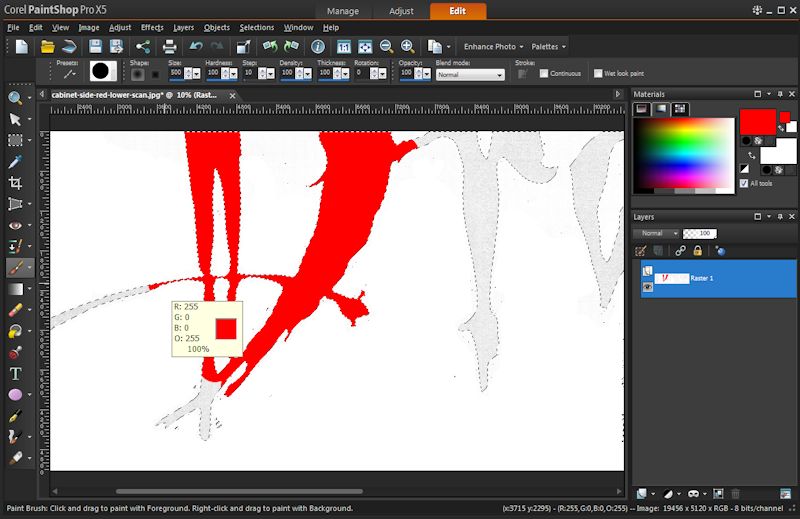 Then just use the “Paint Brush” with a large diameter size to color in the red areas (only the active areas will be colored in). See Image 3 for a partially completed graphic.
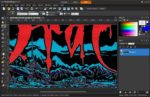
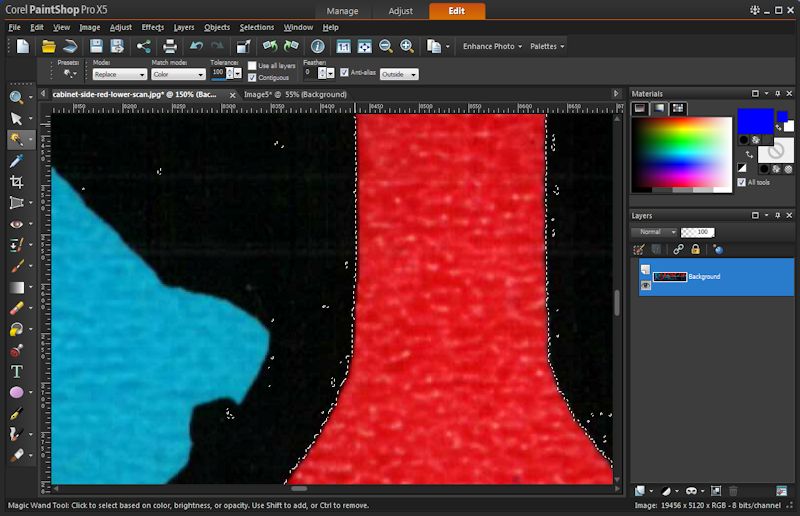
 The same technique applies if you were creating a four color decal from this image. Once the edges are highlighted just use the “Magic Wand” to select all the red areas and color them in and then do the same for the light blue, purple and black background. In Image 4 you can see where I’ve selected the light blue areas and began coloring them in.
Note: To select multiple areas hold down the shift key while clicking on each area with your mouse.
Using this last technique you will end up with a gray 1 pixel border around each colored area. To clean this up do the black last and rather than select the background select all of the colored areas and then invert the selection as we did previously and paint it black.
Magic Wand Overview
If your software package does not have something equivalent to “Find All Edges,” or that technique didn’t work well, then your best friend is the “Magic Wand.” It is used to select an irregularly shaped area based on color, and you can adjust the sensitivity of the color selection.
Once an area is selected you can use other tools (“Eraser,” “Paint Brush,” etc.) and only the selected area will be affected. This removes a lot of tedious work when cleaning up an image.
Imagine you have an image that is black on one side, white on the other and has shades of gray in-between. If you click on a pixel in the black area with the “Magic Wand” tolerance set at 1 only the black area will be selected. If you then move the eraser across the entire image only the black areas will be erased.
Note: The tolerance is measured in shades from the original pixel selected.
If you set the tolerance at 20 and click on the black area the first couple of shades of gray would also be included in the selection. If the tolerance is increased to 40, more shades of gray would be included. If you kept increasing the tolerance, eventually the entire image (including the white) would be selected.
Keep in mind that a black area, or any other color, on a scan or photo will actually include numerous shades of that color. The tolerance is measured from the original pixel selected so moving over even one pixel when you click can dramatically change the area that is selected. Keep this in mind when adjusting the tolerance and click on each colored area a few times as you do the fine-tuning.
I usually start with a tolerance of 32 and then reduce it as necessary.
The other nice feature is that you can invert the selection. For example if you had twenty red circles on a black background, you could select the background and then invert the selection. Now all of the red areas become the active area.
Magic Wand Example
In Image 5 you can see the “Magic Wand” tool circled on the left and the tool parameters circled on the top. While other products may have different settings, all will have a tolerance setting which you will be your most important adjustment.
For PaintShop Photo Pro X6, set the “Mode” to replace, the “Match Mode” to color (you can play around with the other choices, but I find this one works the best), “Feather” should be 0 and “Anti-Alias” should be turned off. Both of the last two settings will help give nice hard edges to the graphic, which is what we want.
 I typically use the outside selection, but in some cases inside will work better. It’s hard to explain, just give it a try and you’ll figure out what it does.
 In Image 6 you can see where I clicked on the black area with a tolerance setting of 20. I then gradually increased the tolerance until I was getting a good selection on the black area (see Image 7, tolerance setting of 100).
 In Image 8 you can see a zoomed out view of the selection. At this point just hit the Delete key and the background color is gone (see Image 9). All that’s left now is to use the eraser and start removing everything except the red areas. This takes a while since you will have to zoom way in and work your way all around the border of the red areas and clean them up.
 In my case I removed the light blue and purple areas with the eraser, but you would want to keep them if you were making an entire decal rather than just a stencil.
Sometimes selecting the colored areas rather than the background (use shift and mouse click to select multiple areas) works better. It just depends on the colors and complexity of the image.
In either case, keep in mind that you can switch back and forth as you work using the invert selection function.
Clone Tool
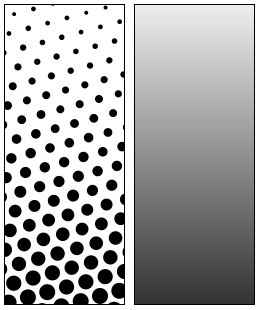
Most of the time I use the “Paint Brush” for cleaning up scratches and other graphics damage, but there are times the “Clone Tool” works better. This is especially true when dealing with halftones (see image to right, close-up and distant view). Halftone is a technique used to create the illusion of additional colors with small dots that are varied by size, shape or spacing.
To use the “Clone Tool”, you select the are you are copying from and then move the tool across the area you are copying too.
Flood Fill
Most pinball graphics are created using a four-color process (only four colors are used). The “Flood Fill Tool” provides a quick way to fill areas, clean up artifacts and reduce the color count. I typically start with a tolerance setting of 32 and then decrease it if I’m picking up adjacent colors.
For example, if you click on a yellow area next to an orange area, both will probably be filled with the new color.
Some programs will provide the ability to deselect contiguous mode. Contiguous is typically the default mode and only adjacent colors are filled rather than all colors in the entire image that are within your tolerance setting. While turning off contiguous mode is faster, you will sometimes change colors in other parts of the image you didn’t intend to.
Some programs also have an anti-aliasing setting in “Paint Fill.” Turning this on and setting a low value (1-3) will cause a slight expansion into adjacent colors and remove “dust” in the image. Sometimes this works great and other times it messes up the hardness of the borders.
Color Correction
Whether working from a scan or camera image, the represented colors will seldom match the actual colors. You can get them closer though with the “Levels Adjustment Tool.”
Open the tool and then select an area that should be, but is not currently, true white. The software will make that area true white and adjust all other colors accordingly. You can also use the tool to select a true black area and adjust the image colors, although this sometimes will get you farther away from the colors you want.
If the area you are working with does not have any white (most of the time you will have some black in any graphic) you can add a sticky white dot (available at office supply stores) to the graphic before scanning or photographing. Once you’ve adjusted the white level you can fill in the dot to match the background color.
Also, always work in RGB mode rather than CMYK. The latter uses a different color space and typically does not provide as vivid a colors as the original silkscreen or printing.
Testing Your Edits
Sometimes a single pixel of the wrong color will stand out like a sore thumb. Other times things that seem horrible while editing will not even show up when printed. Until you get the hang of it, it’s best to print a sample of your work every so often and see how it looks.
Sequence of Editing
- Set resolution to 300 DPI and crop image as necessary.
- Remove any graphics you do not need (for example, when creating a decal).
- FIx any damage to the graphic with “Clone Tool” or “Paint Brush.” Cleanup any halftones.
- If you are printing the graphic, use “Levels Adjustment” to set white and black, as needed.
- Fill all colors using the “Fill Tool” or “Magic Wand” and “Paint Brush.”
- Fill black and white using the “Fill Tool” or “Magic Wand” and “Paint Brush.”
- Inspect image for any artifacts (dirt, dust, etc.) previously missed.
- Print a proof and evaluate the image and the colors, adjust as necessary.
Comments
Comments, including suggestions, improvements, errors, etc. are welcome (see below).
If you have a specific question about your game that does not directly apply to this page, please see our FAQ section.