Caution
Pinball machines contain potentially lethal voltage. Dangerous voltage may remain for a period even after it is unplugged. Prior to opening a pinball machine, be certain to unplug it, then turn it on to insure that it was actually unplugged. It is recommended that the machine be allowed to sit several minutes to allow any remaining power to dissipate. High voltages can be present on any machine, even unplugged, and it can be lethal. Read precautions before proceeding. Proceed at your own risk.
Battery Replacement Options
AA and NiCad batteries leak. They will ruin your CPU board if left in for too long. To make it unlikely to occur, replace your batteries annually. Yet even then, battery leakage can occur and ruin a board. So get rid of them!
There are five different options and which one is best for you depends on which game you own and your skill level.
1) Memory Capacitor
2) Remote Battery Pack
3) NVRAM
4) Coin Cell / Watch Button Battery
5) AA Lithium Batteries
Note: Click on photo for a larger image.
Memory Capacitor
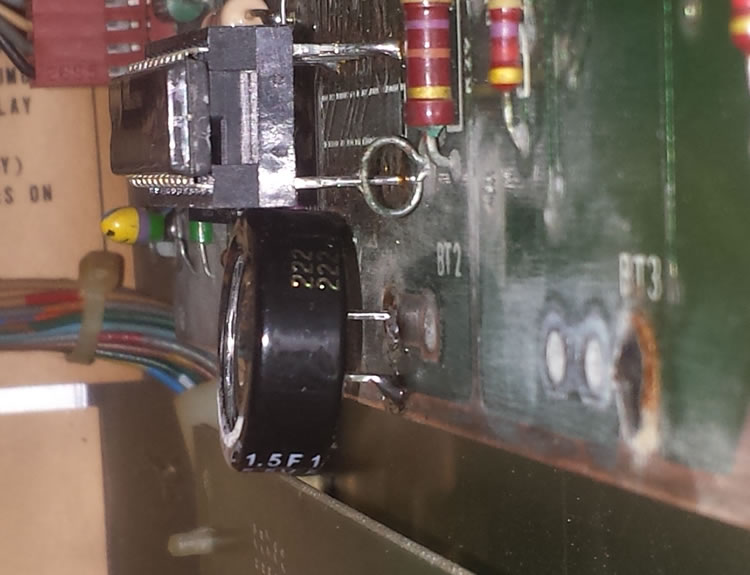
The least expensive is to install a capacitor as this will never leak.* These are available at at electronics suppliers (search for Part Number: CERS-1.5F-5V). These only work on early solid state pinball machines (see Pinwiki for a listing). They are also available at Mouser and Newark Electric.
Note that this will not work on Williams WPC games nor any game with a clock running when powered down.
We have had Bally games in storage for 4+ months that have retained their memory with caps. We have less experience with Williams games, but so far the limit seems to be about a month. This may vary depending on who manufactured the 5101 RAM.*
Early Bally / Stern SS
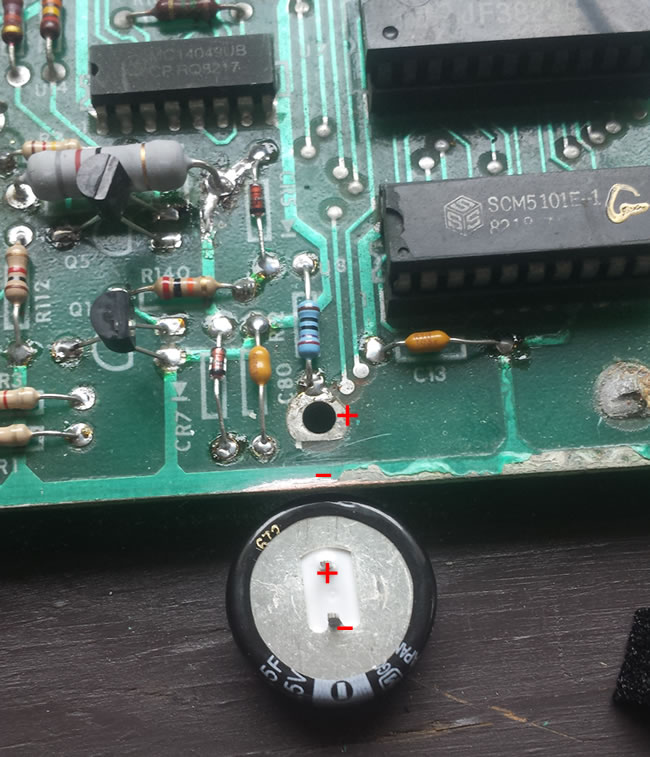
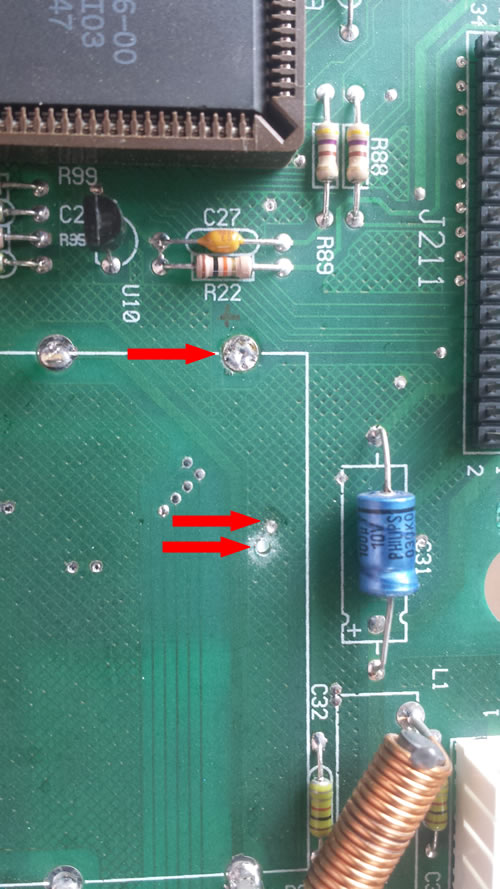
Installation is easy (see photos for early Bally / Stern). Just remove the solder on the left side of where the battery used to be (the right side will not work). Flow a little new solder in the hole so it will melt easier, then remove the solder with a solder sucker or wick.
Immediately below this spot, on the edge is the ground trace. That will be your second connection. Clear and clean a spot. Use fine sandpaper if necessary. Make sure solder will stick by applying a small amount to this ground trace.
Insert the positive (+) end of the cap into the positive (+) former battery hole. Don’t solder it yet. Solder the negative (-) side of the cap to the ground along the edge of the board while leaving the (+) in the battery hole. Solder the (+) in the battery hole.
You are done. Note that the board may not boot the first time as the capacitor has to charge. After a few seconds, turn off and try a second boot if needed. We have found that these capacitors keep memory for longer than 6 months with the machine turned off in Bally / Stern pins.
*Note that there are reports that certain brands of 5101 RAM drains the cap (and batteries) quickly, specifically . If your 5101 RAM is from AMI, the capacitor might drain too fast to be useful. Installing NVRAM might be a better option. Phillips 5101 brand RAM (PCD 5101) seems to work quite well.
Note: If a previous owner installed an AA battery remote pack, then they installed a blocking diode in for R12. That diode would prevent the capacitor from charging. For this to work, the diode must be removed and R12 reinstalled.
Williams 3 – 7, Williams System 11
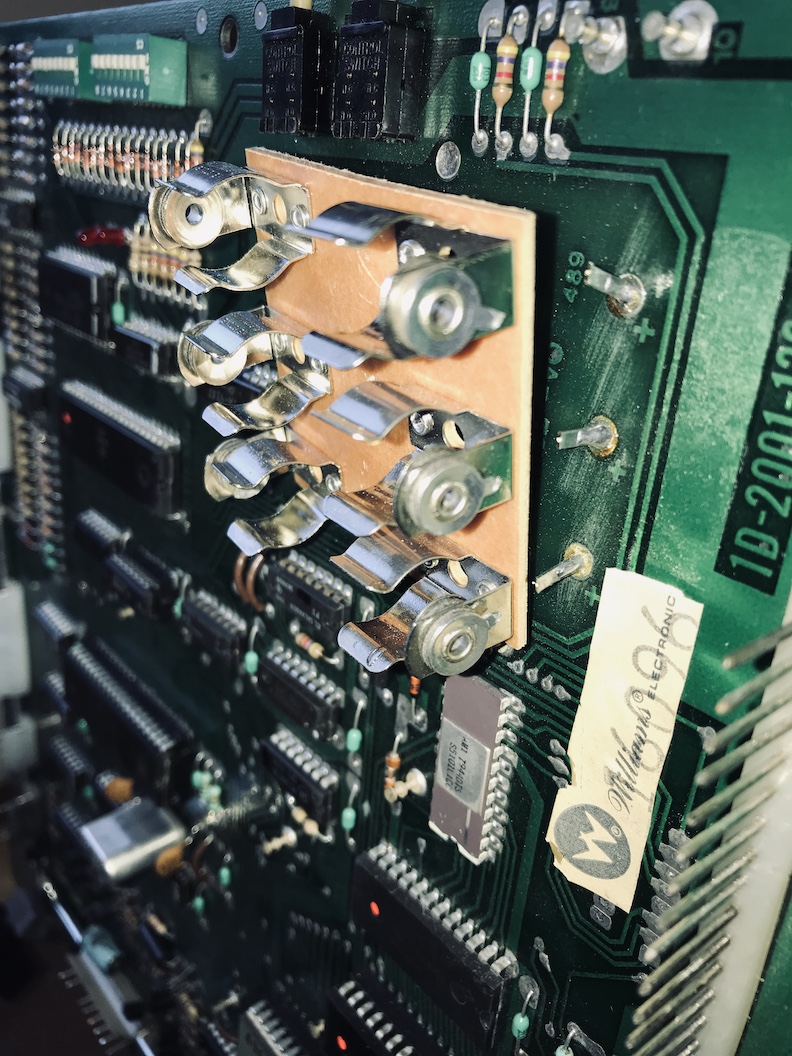
The addition of a memory capacitor for Williams 3-7 and System 11 boards is essentially similar to the Bally, but requires a few more steps:
* Remove the AA battery holder. This can be cut away to make the process easier. Remove the remaining stubs in the solder holes.

* Identify the (+) and (-) holes on the board, where the AA battery holder was removed. They will be opposite ends of the battery holder.

* Solder a wire on the ground (-) tab on the capacitor – long enough to go from the (+) hole to the (-) hole.
* Solder the (+) side of the cap in the (+) hole on the board.
* Solder the wire to the (-) hole on the cap.
* Remove the blocking diode located near battery area. For some 3 – 7 boards, that is D17. For System 11, that is D2.

Note: There are two diodes next to each other. The blocking diode is the smaller of the two. The other diode, usually the standard 1N4004, should be left in place. Look closely at the photos and insure you are removing the correct diode.
* Replace the diode with a 100 to 240 ohm resistor, 1/4 or 1/2 watt. The exact value is not critical. This is to keep too much current rushing into a discharged capacitor. The higher the value, the longer it will take to charge. Too low of a value puts stress on the 5V power supply.
The first time turning on the game, it might not boot. Leave it on for a minute or two, then turn off and restart.
The game will need to be left on for about 1 – 4 hours for the capacitor to charge. Usually, the capacitor will retain the memory for months, once fully charged.
Remote Battery Pack
Many pinball machines cannot use a capacitor. Generally, those machines with internal clocks drain a capacitor too quickly. These machines have AA batteries on the CPU. A remote battery pack keeps those AA batteries, but removes them from the playfield. Because these can still leak, they should be placed away and below any electronics.
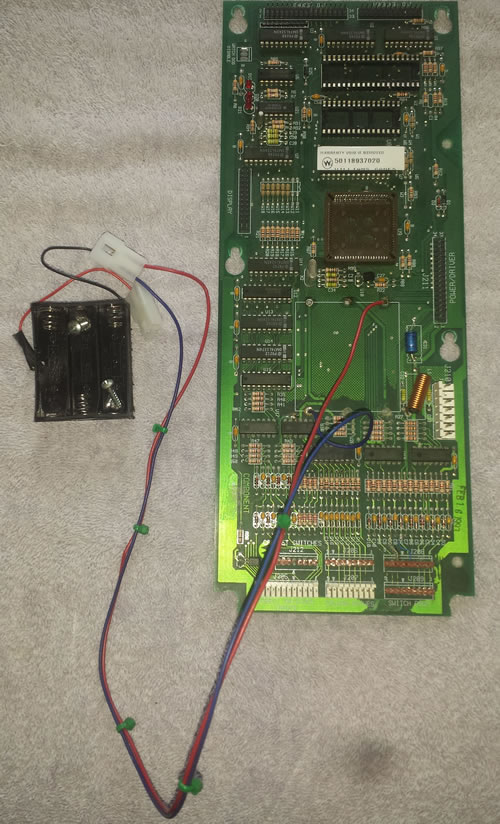
Pre-made packages are available or you can make your own. When making your own, generally, the battery holder is removed and wires are soldered to connect the pack. It is a good idea to include a plug so that the CPU can be removed without the battery pack.
The disadvantages of the remote battery pack is that it is easy to lose the memory settings if the CPU needs to be removed, the batteries can still leak, and the AA batteries should be replaced annually.
Overall, remote battery packs are the least attractive of the options and we no longer use them.
If soldering wires, the positive goes on the top right battery holder hole, while the negative goes to the lower left, as indicated in the photo in WPC-89 pins. Confirm this on your CPU.
Note that if installation of this pack is done with the power off, then the machine will lose all of its settings, so write them down. Pre-made packages have the dowels in place of the batteries. If performing this installation with power on, lethal high voltages are present (see ‘Caution’ above). Soldering, as shown in the above photo must be done with the power off and the CPU removed, so all settings will be lost.
NVRAM

In an ideal world, all pinball machines should use NVRAM. But that did not happen, so we are stuck with dealing with batteries.
NVRAM stands for non-volatile random access memory. It does not need a battery to keep information in place. Unfortunately, the size that would fit our pinball machines is no longer available. So smart entrepreneurs have made adapters. They do the job very well.
Here is a partial list of pinball NVRAM suppliers: barakandl, Pinitech, LockWhenLit, Flippers.com, PinballROM, PinballElectronics, as well as the regular pinball parts suppliers.

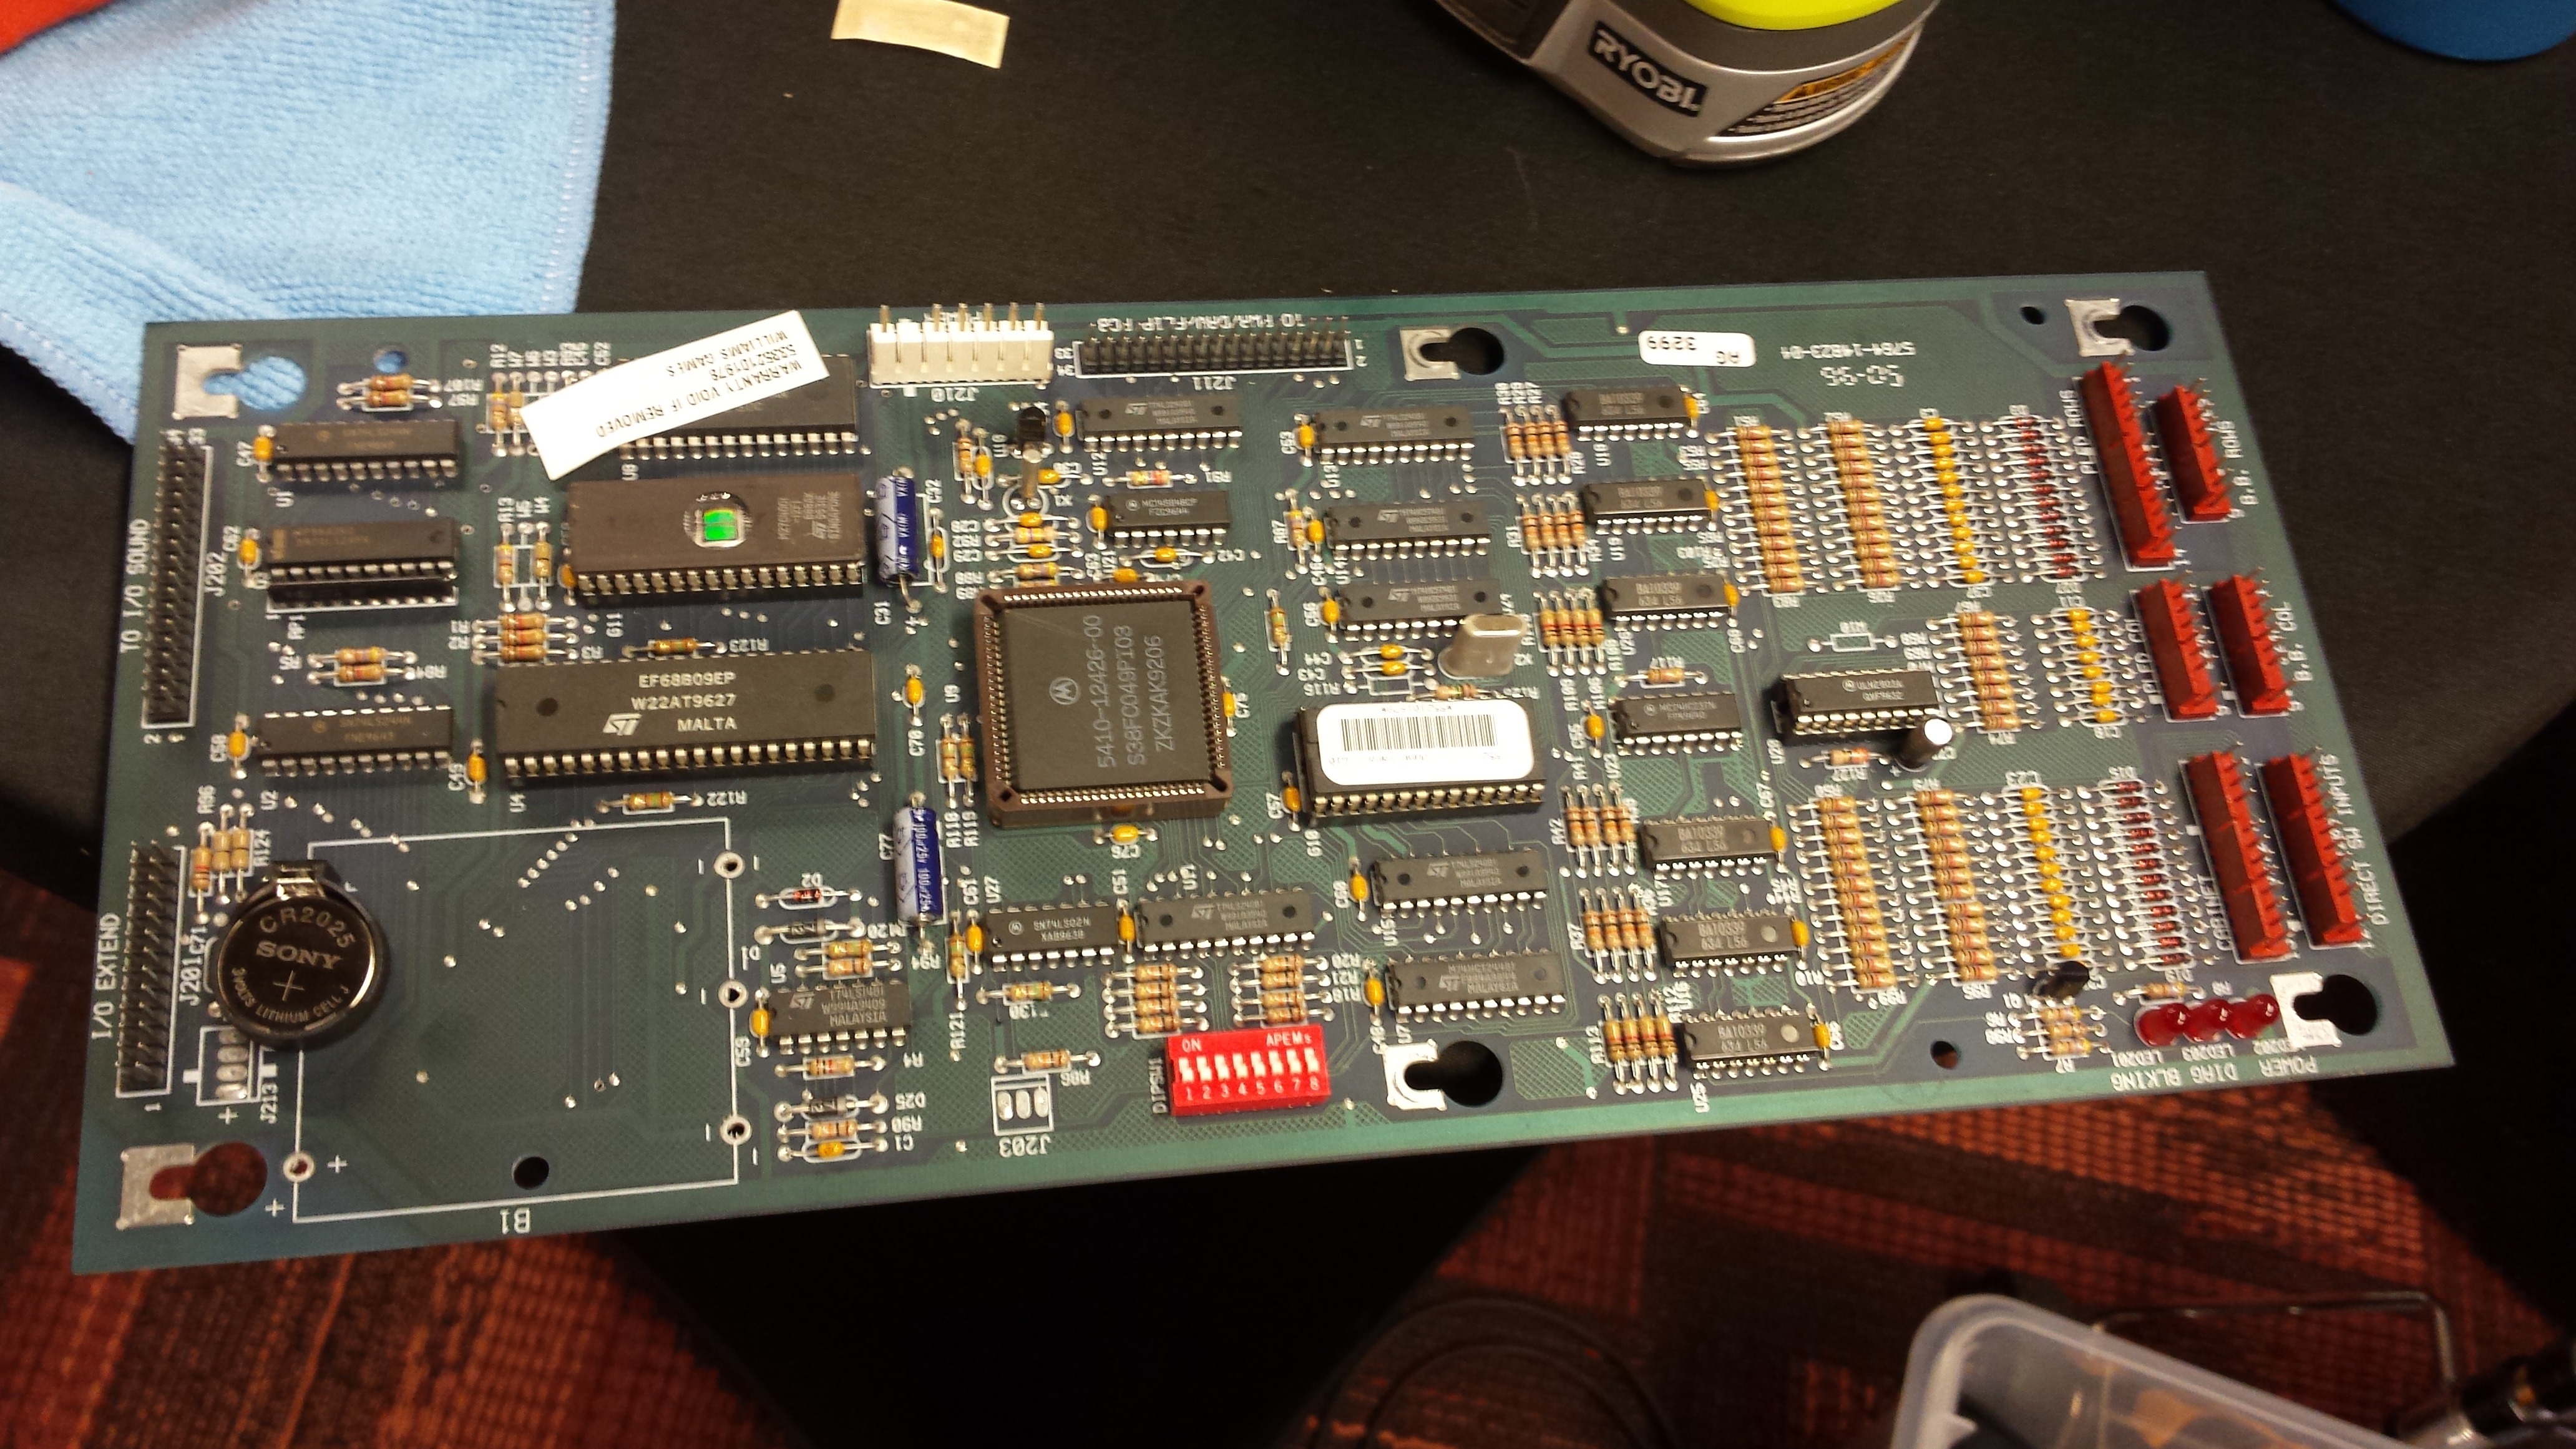
We recommend NVRAM if your RAM is in a socket. The good news is that most Data East, Sega and Stern (Whitestar) and early Bally pinball machines have RAM in a socket. Just turn the power off, remove the old IC and insert the new one in the right direction (this is crucial). If you can pry out an IC, you can do this. Here is a chart listing easy and hard to do pins. Be sure to record your game settings first as this will erase everything.
Pinitech has a handy reference page to determine how hard it is to install NVRAM.
Unfortunately, all Williams and later Bally (WPC Williams) pinball machines have their RAM soldered in place. Removing it and installing a socket is not easy. WPC Bally / Williams boards have fine traces on the circuit board that are easily damaged. We emphasize that if you are not an expert, that you should NOT install NVRAM on a Bally / Williams WPC pinball machine.
If installing NVRAM, be sure to record all your settings first as installation resets everything.
Watch Battery Buttons – Coin Cells
Watch battery buttons (or coin batteries) are the prefect replacement for AA in pinball machines where the RAM is not socketed. These batteries are lithium and are known to last 5 years (although 4 years with the CR2032 is common in a WPC) and rarely leak. The parts are cheap and installation is a 20 – 60 minute job. One has to be able to solder and (sometimes) willing to use a drill on your CPU board, but it is easier that it sounds.
Parts Needed:
1) Battery holders. We got a slew of battery holders from Amazon for next to nothing. Look for Button Battery Holder Case Black for CR/LIR2032 2025 2016, or something similar. Those numbers at the end are the battery numbers (types) that fit, in this case are 2032, 2025 and 2016.
Note: The larger the battery, the longer it will last. For that reason, we recommend the CR2032 battery and a battery holder that will accept this larger battery. A comparison of the batteries.
2) Watch (button) batteries. We got several of the CR2032 batteries. Get a good name brand. Lookout for inexpensive imitations as they may not last long and could leak. Fakes are rather common online. A low price may mean a fake.

3) A 1/16″ drill bit (~1.5mm). A drill. See steps 1 – 6 and 12 – 17. [Note, this is only needed in certain circumstances. See step 16.]
4) Pencil or sharpie.
5) Solder, soldering iron, and desoldering tool (wick or solder sucker).
6) Fine wire cutters.
7) Thin wire or left over clipping from a resistor.
Installation of the Watch (Button) Battery in Bally/Williams WPC
Note: (-), “-” and ‘ground’ mean the same thing for this discussion.


8) Record your pinball machine’s settings. This process will erase everything.
9) Turn the power off and unplug. Remove the wires connected to the CPU. Loosen, but do not remove, the screws holding the CPU in place. Lift and remove the CPU.
10) Remove the batteries (all your settings are gone! – see step #8).
11) Clip off the old battery holder with fine wire cutters. Don’t try to save it. If you ever want AA battery holders, buy a new set.
12) Unsolder and remove any remaining tabs in the playfield from the old battery holder.
13) With the battery holder removed, carefully inspect the board for any residue from battery leakage. This must be removed / neutralized. If not, it will attack the board later.
Battery Leakage Removal
14) Battery leakage is supposed to be alkaline (base) so we neutralize it with a weak acid.
a) Wash with vinegar (or in a pinch, lemon juice). If needed, lightly scrub with a toothbrush being careful to not break any wires or traces. Repeat. If bubbles form, it is a sign of an acid/base reaction. Continue until bubbling stops.
b) Flush with water. It is important to remove the weak acid. Optional: rinse with a water / baking powder solution to neutralize any remaining acid – then flush with water.
c) Rinse with 91% isopropyl alcohol. The purpose is to dry the board. Or dry carefully using a hair drying being careful to not overheat the board.
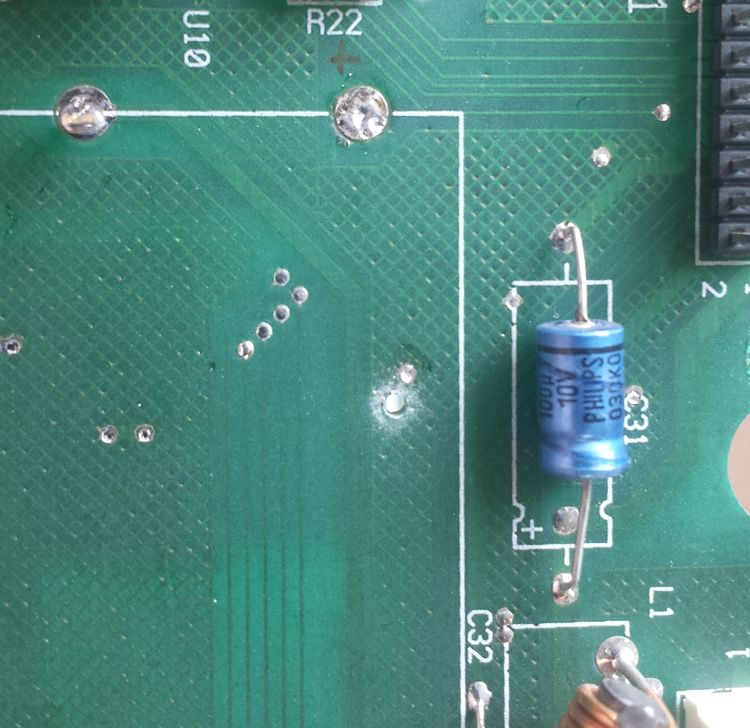
15) Remove the solder from the top right hole. This is where the positive (+) voltage is applied in WPC89 CPUs. If doing this on another generation or manufacturer CPU, you will need to determine which hole to use. [See top photo in this section.]
Note: Washing with vinegar will remove surface corrosion. Sometimes this will take care of the problem. But further corrosion may lurk down in the circuit board and it could come back to haunt you after a period of months or even years. For complete cleaning, you will have to remove the components in that area and sand. See the link to the video at the end of this page.
Without Drilling
If you are living life right, you might just be lucky enough to do with without drilling. This seems to work best with WPC95 CPU boards.
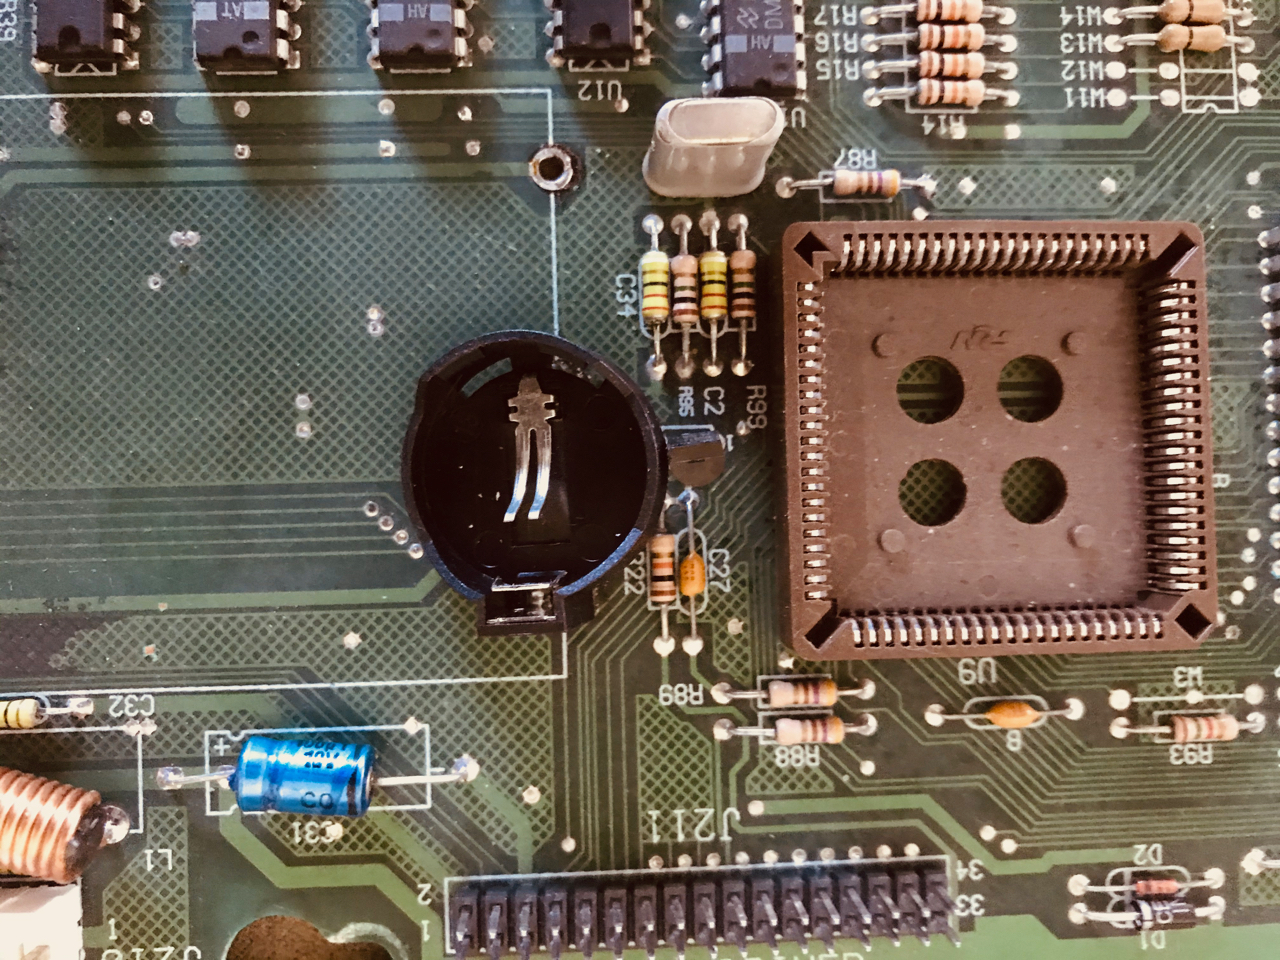
16) Inspect the six holes left behind after removing the battery holder. Four of the holes connect to each other. In this WPC board, the top left hole connects to the bottom middle hole. The top middle hole connects to the right bottom hole. Check to see if this is true on your board. Identify the “+” and “-” locations. Photo shows typical Williams WPC89 board. Note the battery damage on this board which has yet to be removed (see step 14 above).
17) Identify the positive (+) side of the watch (button) battery holder. Generally, the positive side is the edge of the battery.
18) Insert the (+) side of the watch battery holder into the “+” location on the board. On this WPC board, this is on the top right.
18) If you are lucky, your battery holder is just the right size and does not sit on large components. The other pin of the battery holder, the (-) side, will slide right into the center top hole. Then you don’t have to drill. If the (-) side will not fit in any one of the other battery holder holes, you will have to drill. Go to step 22).
19) Solder the (+) contact of the watch batter holder into the “+” hole on the circuit board.
20) Solder the (-) contact of the watch battery holder into the center hole on the circuit board.
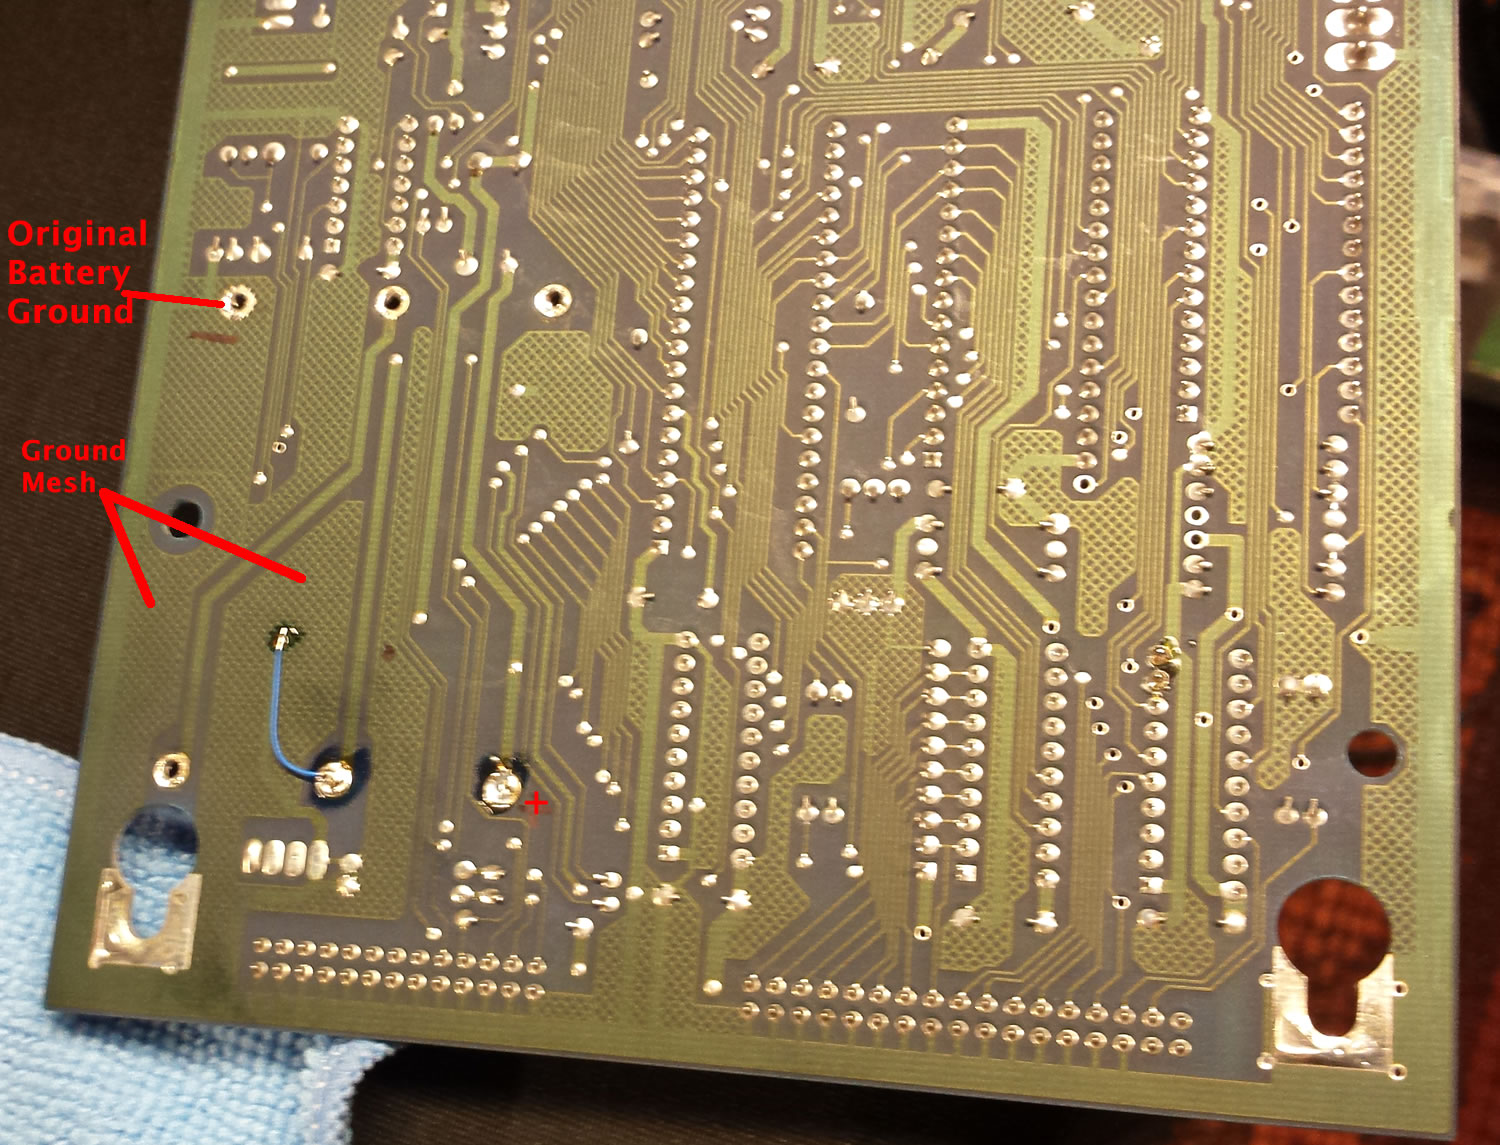
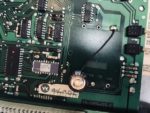
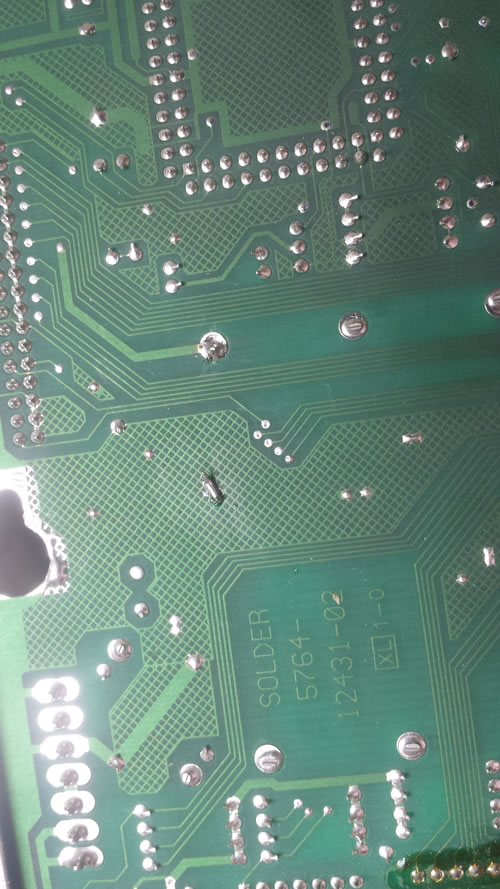
21) On the rear of the board, run a wire from either the hole with the (-) contact of the battery holder to ground (-) as shown in the photo. This connection can be made to any ground – ground mesh is used in this photo. Or to the place where the “-” terminal of the battery used to be located.
All done!
WPC-S has a separate board for batteries and the watch battery is easily installed there.
Do You Have To Drill? Maybe Not!
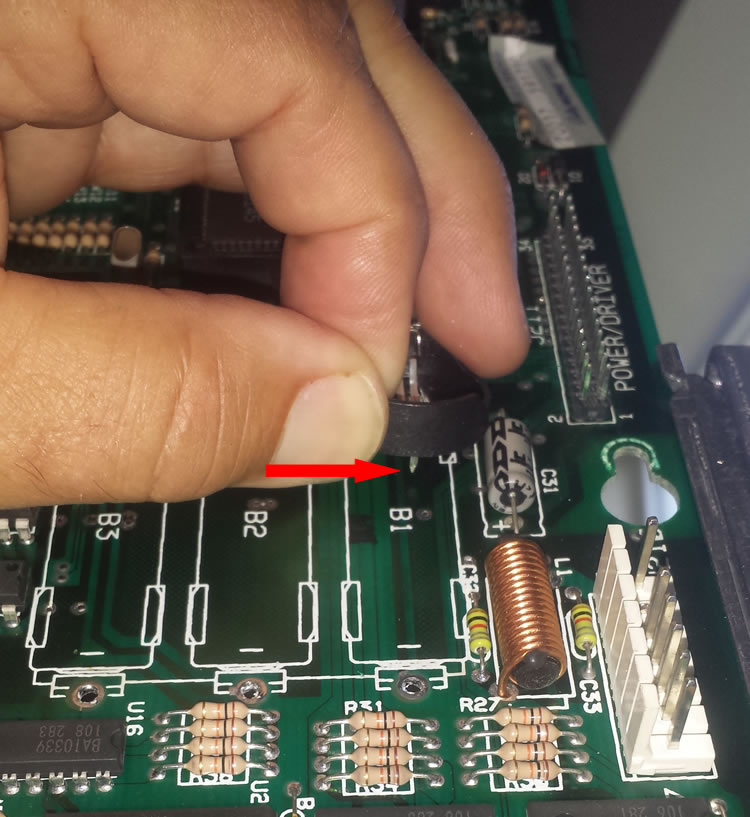
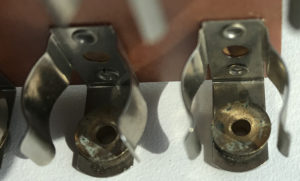
Those who are working with WPC89** pins have one minor little small issue. When trying to place the watch battery holder in the top right (+) hole, and the other connection into the hole to the left, the holder lies on top of a component.
In this photo, the watch battery holder will fit, but it may sit partially on the resistor or push the transistor slightly. If you are OK with this, you don’t have to drill. Just install it following steps 16 – 21.
** WPC Alpha Numeric, WPC Dot Matrix, WPC Fliptronics 1, WPC Fliptronics 2, and WPC – DCS.
You Decide To Drill – Not Difficult To Do
If you don’t like the idea of having the watch battery holder crowding or on top of a component, then just drill a tiny little hole in the board. It is very easy to find the spot and drill the hole without damaging the CPU.
22) Insert that lead into the positive (+) hole identified in step #16. Aim the other over the “mesh” area on the board that is ground. Make a mark with a pencil or sharpie. Confirm that there is ground on the other side of the circuit board (crucial). Caution: Do not drill unless there is a ground ‘mesh’ on BOTH sides of the circuit board.
23) Drill the hole. Confirm that ground is on both sides of the board. Locate a nearby ground solder spot.

24) Insert the battery holder. Be certain positive (+) side of the battery holder goes into the positive side on the circuit board.
25) Solder the positive (+) side of the battery holder to the board.
26) Solder the thin wire to the negative (-) side of the battery holder aiming towards the solder spot. Solder the wire to the nearby solder spot. Or use a small knife and scrape away the green mask and solder to the copper on the board.

Use of AA Lithium Batteries
The easiest way to avoid leaking AA batteries is just to junk those alkaline batteries and slap in AA Lithium batteries. But here are a few precautions:
27) Check the battery holder.** If it has a spec of battery leakage on them, the best thing to do is remove and replace the battery holder to get that leakage out of there. While at it, make sure there is no corrosion under the battery holder nor below it. If doing that, it is easy to do the watch battery replacement above.
28) Neutralize any battery leakage as outlined in step #14.
29) Purchase the correct AA lithium batteries. The cheaper AA Lithium batteries are not designed to be rechargeable. They are perfect, since these batteries are not being recharged. Rechargeable lithium batteries can be used, but they cost more.
30) Place a note underneath the batteries on the holder, or along side that says “Use Lithium Batteries Only” and hope someone in the future will not put leaky alkaline batteries in the holder.
**We never put AA Lithium batteries in our pins. ~100% of the time the cheap AA holders are damaged or worn out. If the battery holder has to be replaced, it is easier to do one of the other options. But if this works for you…….
Comments
We are always looking for comments, including suggestions, improvements, errors, etc. for this page (see below). We are certain we have not thought of everything and there maybe mistakes.
If you have a specific question about your game that does not directly apply to this page, please see our FAQ section.
Additional Resources
PinTech NVRAM Options
An Overview of Battery Replacement Options
Pinball or Arcade PCB Alkaline Corrosion Abatement Process
TerryB’s Guide to Cleaning Battery Corrosion
Copyright 2014 – 2023, all rights reserved.
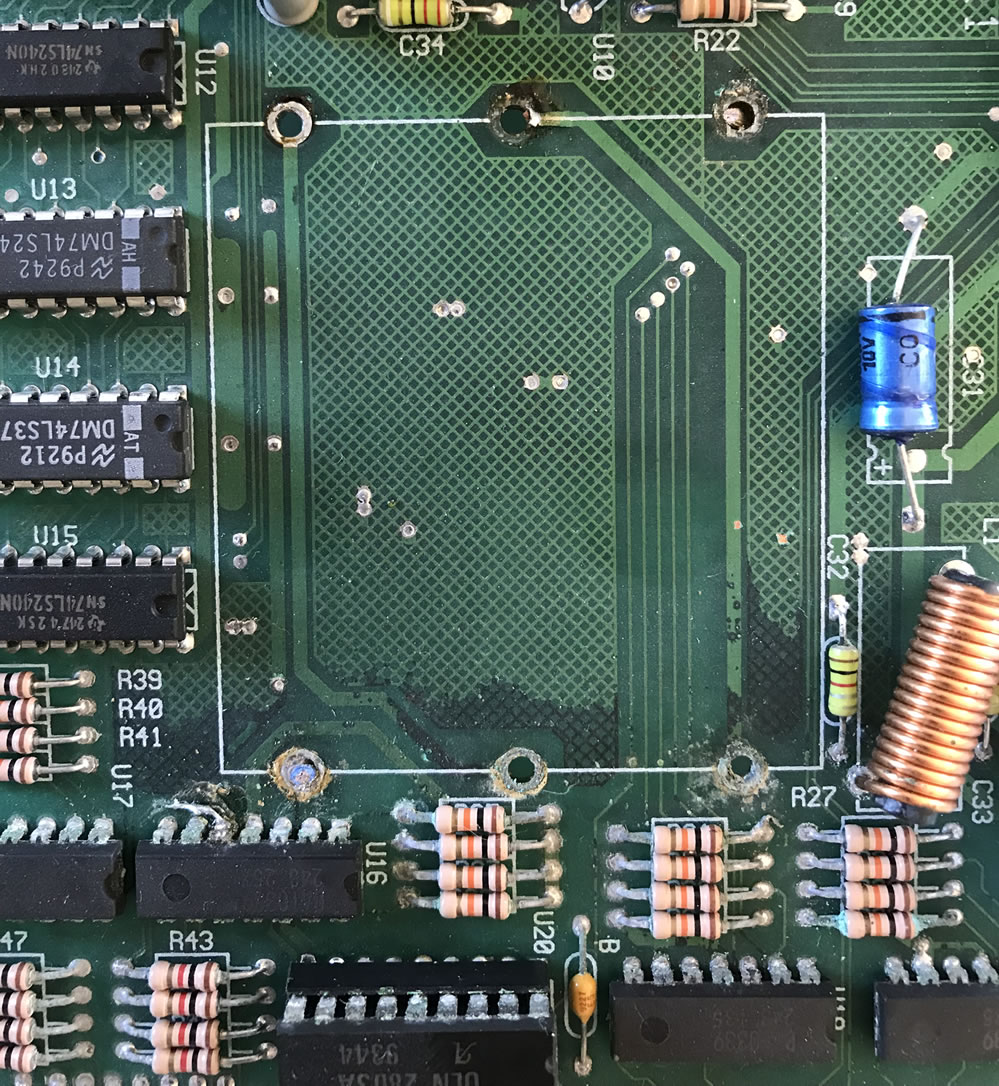
Hi, i have a Williams bride of pin bot machine 1991.
Can you tell me what C32 and C33 are. They are near the battery holder.
Are they capacitors? If so what is a suitable replacement for them.
My info says they are 1K pf 50volt (+/- 20%)….not sure??
I suspect we are looking at the same manual you have. Ours, on page 2-6 lists part 17, C32 and C33 as ‘Capacitor 1KP, 50V’. To us, that means 1,000 pF. There are converters on the web:
https://calculate.plus/en/categories/electric-capacitance/convert/1000/pF/to/uF
And that comes up with 0.001 uF
We would use one of the same form factor. We would visually compare those available with what you have on that board. There are three different ones available at Great Plains Electronics. We usually try to use the same V (voltage) or higher.
Part Number CCA-0.001uF-50V
Part Number CCA-0.001uF-100V
Part Number CCD-0.001uF-100V
https://www.greatplainselectronics.com/search.asp
We love Great Plains, but there are other options that might ship more quickly. One of the electronics parts supplier might have that too.
Thanks for all the great info. You have a great site.
I noticed my NVRAM in your picture. Can you add me to your list of suppliers? I also have a huge selection of ROMS, LEDS, ICS etc. I have my online store @pinballrom.com, a Pinside store and an eBay store (rompingirl). I have been in this hobby for 30 years!
Thanks
Dave
We would be glad to add you. We need to update our list occasionally and like to include everyone, such as yourself, that is helping to keep this hobby thriving.
Best regards,
The HomePinballRepairTeam
The NVRAM LH5268A is a compatible replacement for the MS6264
So I was thinking of using CR2032 coin cells in my machines, but at least Mousin’ Around seems to need 3 x AA batteries, which is 4,5V to my understanding. Is that 3V that CR2032 supplies enough in that machine?
We have always used the memory capacitor in a Williams System 11 pin. We like the cap because it never needs replacement. But the machine does need to be turned on regularly in order to charge the capacitor, perhaps once every 1 – 4 months.
The 3v watch coin cell battery should work fine. It works in Williams WPC pins and they use 3 AA batteries also. It will need to be changed every 2 – 4 years.