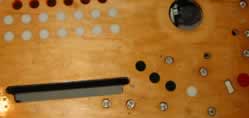
 Once everything is removed, including the black pieces of wood along the edges (pry off the staples from underneath), place the tracer paper down and locate every hole.
 It is helpful if you indicate what screw and plastic post goes in each hole. I used a black pen on the paper to indicate the hole. Then indicate what type of screw and / or plastic post goes there. This reference source will prove to be invaluable when it comes time to putting stuff back!
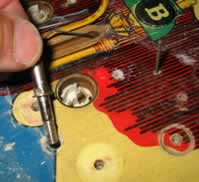
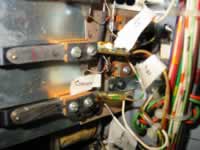
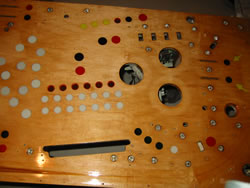
Everything must be removed. That means all pop bumpers, flippers, targets, etc. In some cases, you may be able to just drop the item and let it hang by the wires underneath the playfield. Other, larger and heavier items may have to be removed. If you are lucky, they will unplug. But more likely, you will have to unsolder many wires. Take pictures, use masking tape to label the wires and then use a sharpie to make notations on the switch. Then, pause, take more pictures!
You will also need to pry off the wire guides. If they are damaged, order new ones. Remove the roll over switches and any plastic or other parts that move or stick up above the playfield. Take photos as to how the ball ramp is assembled. It will help you later.

Note that pinball playfields may have lead paint. Take precautions including wearing the proper respirator. Do not sand inside. You will never get the lead dust out of your house.
Now it is time to sand. The professionals use a belt sander. But I was warned to use a dual motion vibrating sander. Why? One mistake with the belt sander and you will have a heck of a trough to sand out. You will need to sand off everything!
Take a look at the overlay you purchased. I believe all of the overlays reproduce the numbers and letterings on the playfield, including the translucent disks. If that is your case, you will need to sand the numbers and letters completely off the plastic disks. If your overlay does not have numbers / lettering on the inserts, you will need to remove them prior to sanding.
I started off with 60 grit, then moved to 150 and finished up with 220 fine sandpaper. This will take a while. Be patient.
I do not know if lead was used in the playfield paint, but I assumed it was and took precautions.
After sanding, clean off the playfield. I used a vacuum cleaner attachment, rags with isopropyl alcohol, then tacky wipes (from paint store). Now pick your wood sealer. I used polyurethane. Others use Varathane, which is a brand name of polyurethane. Some suggest an epoxy resin base. The disadvantage of the polyurethane / Varathane is time – you will need to let it sit for at least one week after you are done (two is better). The epoxy is expensive and tricky to work with but cures quickly.
Follow the prep instructions in the can of material! I applied it with foam sponges and did 4 coats. With some products, you may need to LIGHTLY sand between coats.
If you elect to spray your sealer, use a small paintbrush and add sealer within the holes for the screws. Spraying does not fill these holes and does not clear coat the borders inside the holes!
1. This will make the holes a little bit tighter and smaller which is good for re-inserting the old screws in a used screw-hole.
2. This will prevent the underlying wood from absorbing water when applying the overlay, which can result in rising the wood and tearing up the clear coat around the hole.*
In the timing is everything department, after I finished this step, I went away on vacation for 2 weeks. Do not proceed beyond this point until the coating cures and hardens. During this period of time, I reattached the wood sides (around the edges and along the shooter) to keep the playfield from warping. I put waxed paper underneath to keep these pieces of wood from adhering to the polyurethane.
Note that while polyurethane takes 1 – 2 weeks to completely harden, other coatings may take less time.
Restoration Page 1 Restoration Page 2 Restoration Page 3