 You can make your own pinball playfield rotisserie. Having a rotisserie to mount a pinball playfield is a great time saver and makes a tough job much easier. There are commercial ones (sometimes) available and they are extremely well engineered. However, if you want to save quite a bit of money and are a bit handy, you can build your own.
 This design is compact and fairly inexpensive. There are other rotisseries that use pipes to connect the two ends and keep them at a fixed distance. But that design is more expensive and it takes up room when not in use or requires disassembly for storage – see the links below for more information on those designs.
To save a little money, we made a compromise. We had two spare sawhorses and attached the moving components to the top of each. This cut out a lot of galvanized pipe from the design and makes storage quite a bit easier, especially since my saw horses fold up.
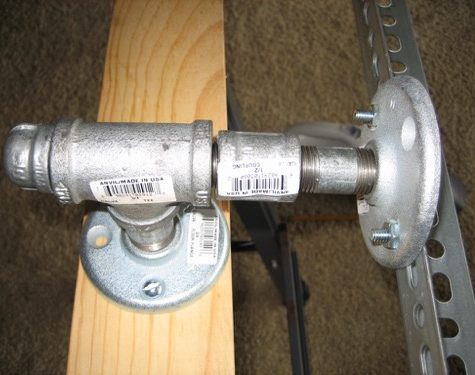
 The pictures included are prior to installing the thumb screws. These are installed by drilling a hole at the top of the 3/4″ Tee with a 13/64″ drill bit. A 1/4″ 20NC tap is then used to thread the hole.
Note: There is a design modification below that substitutes a water faucet handle for the thumb screws and is highly recommended.***
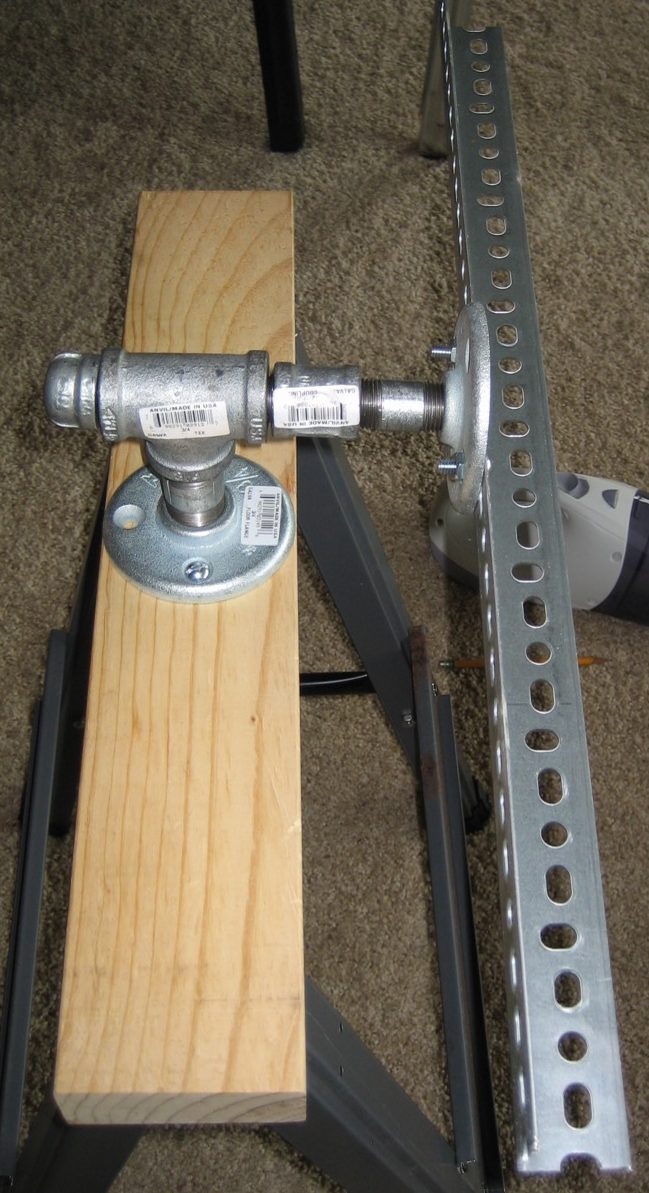 We used a 3-1/2″ pipe (Nipple) within the 3/4″ Tee so that the pipe will not slide back and forth. It would be possible to save a few dollars and just use a longer pipe that connects directly to the 1/2″ flange. However, the pipe will then slide back and forth and it might make the design less stable. It would also make any pre-drilled holes for the thumbscrew, outlined above, useless.
 The size of the angle iron is tricky. Too small (1″ for example) and it can be difficult to attach the playfield.
Too large and the iron will cover too much of the bottom of the playfield, making it difficult to remove parts.
Modification Note: The original design used a thumb screw to tighten the nut, which held the playfield in place. We found that this required a wrench to tighten the thumb screw enough to hold the playfield. A friend (thanks Dennis!) suggested substituting an outside water faucet handle in place of the thumb screw. This is a great improvement and makes it easy to lock and loosen the rotisserie into place. Parts were obtained from an Ace hardware store.  Look for the faucet handle with a square hole (Ace 4005864) and then use a carriage bolt with the square opening. They fit perfectly and it makes a secure connection for the screw. We used a 2″ screw, but a shorter one will work just as well.
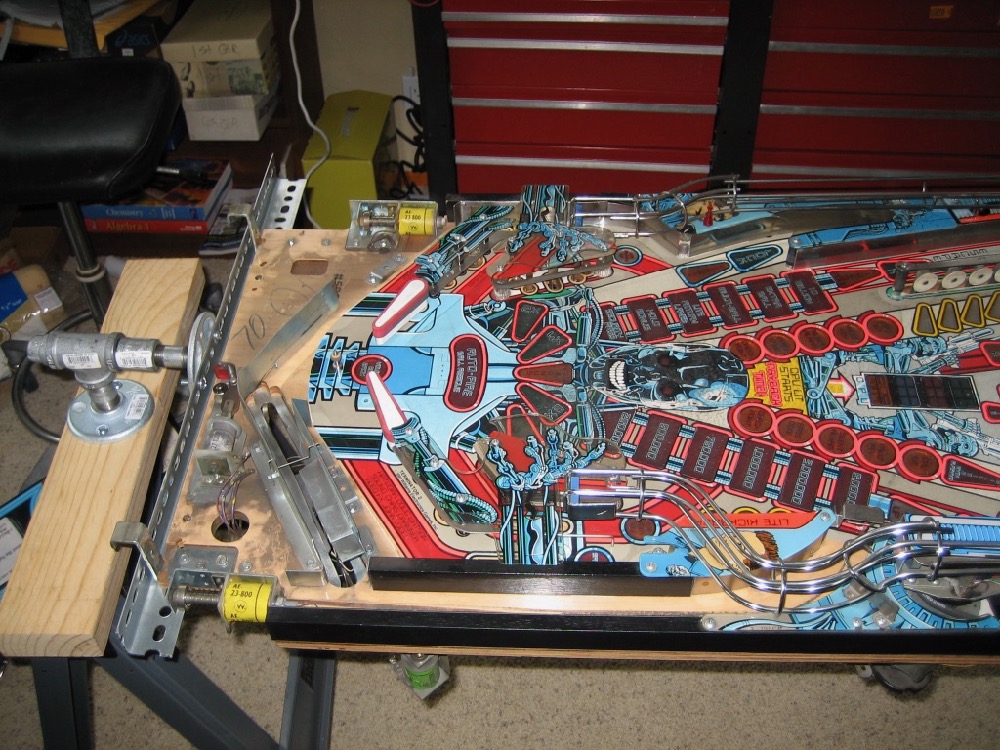
To attach the playfield to the rotisserie, many use c-clamps. This will work quite well, but lends itself to slippage and a catastrophic fall. While some might consider this a sacrilege, we connect the playfield to the angle iron with screws and nuts. In this example, there were already enough holes drilled in the lower (bottom) part of the playfield so we did not have to add any.
However, to secure the playfield, we would not hesitate to drill a couple of holes in areas where they are not visible in the assembled playfield. Or use a wood screw from the bottom not long enough to go through the playfield.
At the top of the playfield, we remove wood screws that hold the top wooden board in place and then use slightly longer screws to attach the playfield to the angle iron. The longer screws must be the same diameter as the ones removed. If they are larger, then when the original screws are replaced, they will not hold. If they are smaller, the screws will not hold the playfield to the angle iron.
All parts are galvanized pipes and associated parts unless otherwise noted.
Parts List:

An Alternative Design
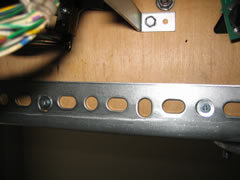
 Here is an image sent by a friend of an alternative design. We have now modified ours by including the clamps shown on one end. We felt that the top of the playfield could not (usually) be easily clamped unless the end piece of wood was removed. Instead, we usually remove 2 0r 3 wood screws that go through that playfield to the wood at the top, and put in wood screws through the flange into those existing holes.
Please leave your comments and questions below.
Copyright 2006 – 2022, all rights reserved.
External Links:
Purchase a Rotisserie – A commercial built one. Very nice.
Build Your Own – A very nice design
Build Your Own – This is also nice.
Build Your Own – Another primitive, but effective design.
Build Your Own – Perhaps the most sophisticated home made design.
Comments
Comments, including suggestions, improvements, errors, etc. are welcome (see below).
If you have a specific question about your game, please see our FAQ section.
Hi. Love the site, detail and forethought put into everything. Really wish the pictures were much higher resolution as its really hard to see whats going on in the low res photos. This comment applies to all of your website, but especially for this section where its not explained very well and the picture links don’t even pull up the low res zoomed in photos…
Hi Marty. Thanks for your comments. If you find some sections that are ‘not explained very well’, please let us know with a link to that page or section and we will address that.
All photos should enlarge when clicked on them. At least they do on browsers we test with. If you are having issues with specific photos, please let us know. Copy the link (the URL) at the top of the browser and send it to us, please.
Size is also an issue. We painstakingly play with size of the photo vs. legibility. If we cannot see it, we change it. But we have hundreds of photos and have to have them as small as possible, so that we don’t overload the server. But if we have not done that properly and they are not legible, let us know and we will do what we can.
Since your note is on the Rotisserie page, are you referring to photos on that page? We will check those today.
I have an old….40s or 50s Williams Doozie that worked great for years. I had a guy come repair it a couple of yrs ago and it worked for a few weeks and then gave up…..and I get no return call from the repairman. To look inside is scary w all the wires…etc. Can the machines be converted to solid state or is there any hope for repair. I’m in Orlando. Or shall I just call the junk man?
I am not aware of anyone who has converted an EM to solid state. It is likely that the time and parts would exceed the value.
#1, don’t call the ‘junk man’. At worst case, sell it. BTW, the Williams Doozie is from 1968.
Depending on the condition, you could get several hundred for it. Perhaps more.
The problem is finding a reliable place to sell it. You could try Craigs List. But beware of scams. Take only cash and don’t deliver it – especially not for someone’s son as a surprise. Those are all scams.
There are several pretty active places to sell it on Facebook. If you are not a member of Facebook, it is free to join. The you can list and sell your game and never go back to Facebook.
Another place is Pinside.
Yes, pinball techs are difficult to find, especially for EM games.
https://www.ipdb.org/search.pl?any=doozie&search=Search+Database&searchtype=quick
This ‘How to Buy’ page has information that also applies to selling a pinball machine, especially its potential value.
https://homepinballrepair.com/buy-pinball-machine-look/