Creating and Applying Water Slide Decals
This article was originally posted on PinballRehab.com.
Reproduced with permission from terryb.
Written by terryb
[Editors note: For a similar process, see making pinball playfield plastics.]
You will find many cases where a water slide decal is the best way to repair pinball cabinet or playfield damage. This approach is appropriate where the substrate (playfield or cabinet decal) is in good physical condition and you want to minimize the thickness of the decal. For example, when the colors on a cabinet decal are faded.
Although you could do this repair with a stencil or silk screen it would require one stencil for the red and one for the black. Plus I had a brand new wand scanner I’d purchased and was anxious to give it a try.
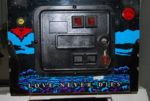
 See Image 1 of the front of a Bram Soker’s Dracula with major fading in the logo and the “Love Never Dies” text. Note: Someone before me attempted to do some touch-up paint on the logo but apparently gave up before finishing. The color wasn’t a good match anyways.
See my article on Creating and Applying Vinyl Decals if you are removing and replacing a portion of a cabinet decal and need to replicate the thickness of the original decal. That method is appropriate when a cabinet decal has been extremely damaged and needs to be cut out and replaced.
For more info, see Restoring Cabinet Graphics – Overview, which covers the different types of pinball cabinet graphics and provides an overview of the restoration process. Links are then provided to individual articles (like this one) that cover each step of the process. All of the detailed articles are also included in the Related Articles at the bottom of this page.

Be aware that inkjet decals will fade more quickly than laserjet decals. If you have an HP printer use their Vivera ink, which will have much better resistance to fading and perform more like a laserjet decal. Other brands of printers may have similar products.
Inkjet decals also require a fixative, which may cause problems if you plan on auto clearing your playfield. Some types of clear will also lift the ink on laser printed decals (lacquer for example). If you are going to be applying a clear coat (other than acrylic), test it first on a sample decal.
Supplies
While you can pick up some of the necessary supplies at your local hobby or crafts store, Papilio Supplies manufacturers high quality, industrial grade products that you’ll have much better success with. The first thing you need is some water slide decal paper and Papilio sells an ultra-thin paper that is almost invisible.
[Editor’s note: Papilio is no longer in business. Many of the links in the original article are no longer valid. We researched the links and found what we think are equivalent suppliers.]
If you are using a laser printer, I recommend their Laser Water Slide Decal Paper (you will not need the fixative described below).
If you are using an inkjet printer purchase the Papilio Inkjet Water Slide Decal Paper. This paper is specifically designed to absorb the ink and aid in making it waterproof (it does not resolve the issue, but serves as the first of a two step process). [ Editor: Note that we cannot seem to find this brand of paper at the moment and would just suggest using an online search for ‘Inkjet white water slide decal paper’.]
You will also need their Decal Fixative which is the second step in waterproofing inkjet decals. I have also used Krylon Preserve It!, but have not had good luck with the other Krylon clear spray paints.
[Editor: Krylon Preserve It! is no longer available. We have had great success with Minwax Polycrylic Spray to seal the decal – but this is getting harder to find. We are going to try Krylon Workable Fixatif Clear Spray and Krylon Acrylic Spray Paint Crystal Clear.]
Both water slide decal papers are available in clear and white.
[Use white when covering up existing artwork. Use clear when the artwork is to show through. Using a color decal over existing color will change the final color, either changing the tint or the darkness of the color. In this application, the author is darkening up existing artwork and using a clear decal works better than white.]
Papilio also sells a squeegee for smoothing out larger decals and removing air bubbles and water. If you’re working with large decals or having trouble positioning them you should also get some of their Decal Mounting Fluid. This allows you to easily reposition the decal and increases the bond strength.
[Another source of mounting fluid.]
I would not do a decal without the mounting fluid, but that’s up to you.
While a lot of people use Windex to make the decal re-positionable it does not strengthen the bond.
Surface Preparation
In order to achieve good adhesion with the decal you need a smooth, clean surface with a semi-gloss or gloss finish. Most people skip this step, but it is critical. You will not get a good bond on a matte finish. If you’re applying over a cabinet decal, since they typically have a glossy finish, all you need to do is clean the surface.
More than likely on playfields you will be dealing with a worn surface or possibly even bare wood. Sand the area down smooth, seal any bare wood, and then apply a couple of coats of either gloss or semi-gloss clear paint before applying the decal.
Printing Decals
When printing decals always use your printer’s photo quality setting. This will provide a denser pigmentation application. When printing samples for color matching always use photo paper, since it’s cheaper than the decal paper, and print in photo mode. If you don’t your colors will be quite a bit different when printed on the decal paper.
Graphics should always be printed at twice the resolution that was used when editing.
Print your decals on the appropriate water slide decal paper as described above. If you’re using a laser printer you can skip the waterproofing section. If you’re using an inkjet printer you will need to finish the waterproofing process below.
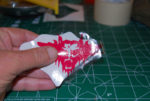
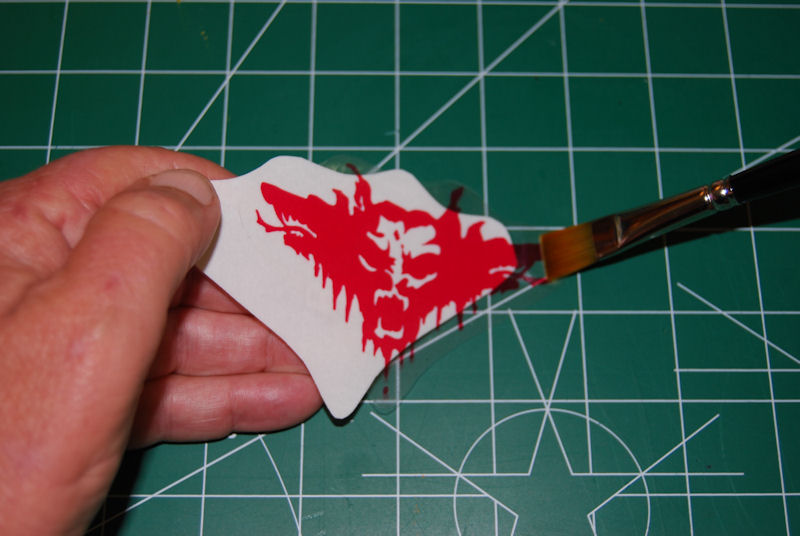
![]() In Image 2 you can see the decal I’ve created for the Dracula pinball using the VuPoint Magic Wand Scanner (see this article for more info) and edited with Corel Photo-Paint (see this article for more info).
In Image 2 you can see the decal I’ve created for the Dracula pinball using the VuPoint Magic Wand Scanner (see this article for more info) and edited with Corel Photo-Paint (see this article for more info).
You will probably notice the red in the attached images is slightly transparent. This is partially because I printed my test decal in regular rather than photo mode, although you will always get some transparency with the clear decals.
Normally this isn’t an issue since you’re putting red over red, for example, but if for some reason you’re putting a light color over a dark color use the white decal paper.
Waterproofing Decals
Please note in advance this process can be a little finicky. I’ve used fixative before with good results but this time the color ran when I put the decal in water. After having trouble I changed over to the Krylon product for this project. Nine times out of ten you’ll be fine with the following process, but if you’re having trouble use more coats of paint or give the decal more drying time before applying the fixative and between coats.
[We have had great luck with Minwax Polyacrylic spray. Start with a very light coat to avoid causing the ink to run. Let it dry – this takes only several minutes. Then a second light coat. Let dry. Repeat with successively heavier coats. Putting several coats on stiffens the decal, preventing it from folding on itself during application.]
First let the decal sit for at least 24 hours after printing. Then apply a medium coat of the Krylon, wait 24 hours and apply a second coat. Then let the decal sit for 24 hours before applying. Yes, you can reduce the waiting periods, but do so at your own risk.
Applying Water Slide Decals
First we need to trim our decal, which should always be done after applying the fixative. If you don’t do it in this order the edges of the decal paper will absorb the fixative making it impossible to remove the decal.
Trim around the decal leaving a 1/4 inch border. Round corners will show less than square corners.
This is also a good time to thoroughly clean the area with Mean Green or Simple Green and then brush on the decal mounting fluid.
Get a bowl slightly larger than the decal and fill it with warm water (not hot). Place the decal printed side down in the water and let it soak for no more than a minute. Just press down with your finger to keep the decal underwater.
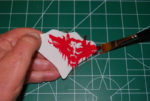
 After 10 to 20 seconds (depending on how warm the water is) you should be able to start sliding the decal off the backing. Before you do that though, press the decal between two paper towels to remove any moisture. Then hold the decal with your fingers on the backing side and your thumb on the decal side. Push with your thumb and slide about 1/2″ of decal off the backing (see Image 3).
Do not touch the adhesive side of the decal with your finger or you will remove the glue.
At this point you have two choices.
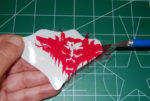
 I typically lay the exposed part of the decal on my target area and then while holding that part down with your finger or a brush (see Image 4) slowly pull away the rest of the backing paper as you lay the decal down.
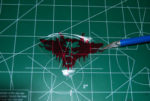
 Others prefer to use an X-Acto knife. Place the blade under the exposed part of the decal (see Image 5) and then while pressing against the blade with your finger, slide about half of the decal off the backing. You can then place the decal into the target position and slide out the rest of the backing.
I tend to get wrinkles with the X-Acto method, but some people find it easier to nail their positioning this way. You could also use tweezers, but it’s easy to tear the decal.
If you need to adjust the position of the decal, and you’re using decal mounting fluid, just press lightly in the center of the decal with a couple of fingers and slide it into position. You can also use a small brush (or two) to position the decal. For larger decals place a finger at each corner and then gently slide the decal into position.
 You can also lift one edge with the tip of an X-Acto knife and then slide the decal (see Image 6)
Once you’re happy with the positioning you will need to press the decal down onto the surface while removing any air bubbles and moisture. If you’re having trouble with the edges of the sticker curling up from the surface it is typically because of poor surface preperation. Using decal mounting fluid will minimize this problem.
 Note: Always work from the center out. For small decals just push down with your thumb and then roll it over like you were being fingerprinted (don’t ask how I know that). You could also use an artist’s brush and work from the center out (see Image 7).
For larger decals using a squeegee is the best solution. Hold two corners down with your fingers (this keeps the decal from sliding) and then wipe towards the opposite side. Repeat from the opposite direction and dab off any excess water (don’t rub).
Finishing Touches
Let the decal dry for at least 24 hours and apply a couple of coats of gloss or semi-gloss clear. This will help blend the edges of the decal and protect it. This is especially important on playfield decals.
For large decals, like a 6″ square I did on a Pinbot, it’s best to have the entire playfield done with automotive clear coat after applying the decal.
 For spot clear coating, I typically cut a hole in a piece of cardboard about 1.5 times larger than the decal. Then hold the cardboard a couple of inches away from the cabinet or playfield while spraying. Don’t worry if your hand holding the cardboard moves around a little while you’re spraying. This will actually help you get a nice blended edge.
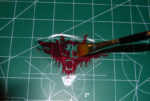
In the last image, you can see the completed project.
Comments
Comments, including suggestions, improvements, errors, etc. are welcome (see below).
If you have a specific question about your game that does not directly apply to creating decals, please see our FAQ section.