After you have let the coating cure, it is time to apply the overlay! First, slightly rough up the surface of the playfield with fine sandpaper. This will help the overlay stick. Now, wipe the surface with tacky wipes to remove all dust. Then wipe the surface down with isopropyl alcohol and let it dry.
Take a deep breath. Find someone to help you.
Pull the overlay out and lay it down. Study it. Note how it is set up vs. your playfield. Practice aligning it on the playfield. Start to relax.
This next part is critical, but easier than I expected. Obtain an atomizer and fill it with water with a little liquid dish detergent. Just enough to create a few bubbles. Have a spare bucket of it ready, too.
Spray the surface with the soapy water until there is water on every part of the playfield. You don’t need a lake, just a complete coating.
It may help to have a light underneath to help position the overlay (don’t get it wet!). Carefully peel the paper off the back of the overlay, which covers the self adhesive. Be careful to not let it stick to itself.
Place the overlay on the wet playfield. Note that it will move easily around as it floats on the soapy water. Position the overlay. Be certain to line up all the roll over switches, pop bumper holes, and transparencies.
Once you are satisfied, with the position of the overlay, take a deep breath and grab a squeegee (or a rolling pin). Have your partner hold onto the overlay. Start in the center and press the water out from underneath towards the outside. This will be easy!
Move down to the next spot and squeeze out more water. Work methodically and carefully so you do not leave a pool of water anywhere under the overlay. If you are careful, you will not have any folds (I had one small one) and maybe a few bubbles (I had none). Bubbles can be popped with a pin. Stop and step back. Admire your work! The scary part is over.
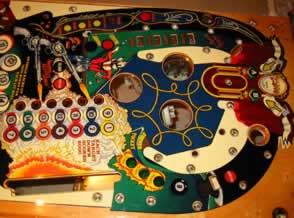
 Now it is time to reassemble your playfield. With my overlay, I had to cut out the small disk plastic roll-over area on the top left of the playfield with a razor blade.
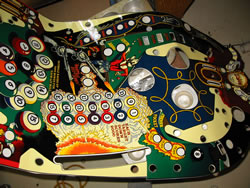
Now that you have everything off, take the time to clean all the components. Those that are hanging underneath will be dusty and full of saw dust. Clean, clean, clean.
I do not recommend coating a playfield overlay with clear coat / polyurethane unless recommended by the manufacturer. Most, but not all overlays have a hard mylar surface that will last far longer than any playfield. Under home use, the overlay will outlast the machine.
You may find that you want to replace your drop targets and playfield plastics, now that you have a new playfield. These can be obtained at various places on the web including:
Steve Young’s The Pinball Resource, Marco Specialties, Fabulous Fantasies. Or make your own.
You might want to protect your plastics with products from Pinball Life, or Decoratorsupply. These disks will keep the pinball from breaking plastics. Instructions for reproducing plastics.
Now you will be happy you used the tracing paper and took all those digital photos. Lay the tracing paper down and carefully align it. Use the head of a nail (not the sharp end) to find the depression that means there is a hole. Punch through the tracing paper and the overlay with a pin. Then select a small nail to make the hole larger. Leave the nail in place. Repeat for the next hole. Leave the nail. The nails will anchor the tracing paper and make it easier for you to find all the holes.
After you have pierced all the holes, remove the paper and start reassembly. Look at your digital pictures. It maybe helpful to view your photos on a laptop or tablet.

I also applied a layer of wax on my playfield before I started assembly. Be certain to contact the manufacturer of your overlay for guidance as not all waxes may be gentle on an overlay. Some may contain solvents that may react, dissolve or fog the overlay.
Reassembly took a lot longer than I expected. But I was careful and cleaned every part. Always use new rubber parts (see sources above). If possible, clean up the screws and metal parts by placing them in a polisher available at Berry’s Manufacturing.

Position the parts you removed and carefully resolder any wires. Be sure to follow your labels so the diodes are oriented properly.
Use q-tips and isopropyl alcohol to clean the contacts. Or squeeze the switches together and drag a business card between the contacts (follow Clay’s instructions).
 Many of the switches, especially the rollover ones, may have to be readjusted. Some of my switches would not activate. Others were so close that the vibration of the game would set them off.
If you take your time, you will be rewarded with a machine that looks beautiful and is mechanically extremely reliable.
*Suggestion provided by and thanks to Jörg Hopmann
Restoration Page 1 Restoration Page 2 Restoration Page 3
External Links
Comments
Comments, including suggestions, improvements, errors, etc. are welcome (see below).
If you have a specific question about your game that does not directly apply to installing an overlay, please see our FAQ section.